
Installing a bi-fuel (propane/gas) system on my '76 F-150...
As much as I love my truck, with gasoline nearing $4.00 per gallon (as of this writing), with predictions of $6.00 per gallon before Bush is done with his second term, something had to be done.
A. I wasn't sure what type of tank I was going to use (I now know that there is no choice - you have to use a forklift tank or other "liquid draw" type tank).
This page is up as of July 9, 2008 - 4:PM. Updated July 20th, 2008 at 4:12 PM
If you have any questions, comments or suggestions, please
A couple years ago I replaced the old, tired 360 C.I.D. power plant with a fresh, new 390 C.I.D. engine. In addition to the new engine I replaced the OEM 2 barrel carburetor with an Edelbrock 1406, 650 CFM 4-barrel mounted on an Edelbrock aluminum intake manifold. To top off this performance package I also installed some really nice (really expensive) Hedman Headers. The truck runs like a top but barely passes emissions. Again, something had to be done. The answer to both these issues could be solved in one, fall swoop; propane.
Finding a propane kit
I had talked to my friend (and fellow drummer) Rich Nance about a propane conversion he had done to his '69 F-150 Stepside 4WD about a year prior to this writing. He was pleased with the performance, but hadn't done any research as to the economy. Last visit he said that he had taken down odometer information and was going to figure out what kind of mileage he was getting. Prior to the conversion he had done research into conversion kits and stumbled across a company called
"gotpropane.com."
Rich highly recommended them, sighting that Cary (the owner) was more than willing to offer assistance after the sale. Post-sale support holds a LOT of weight with me, so I decided to give
gotpropane.com
a chance.
After talking on the phone for a few minutes with Cary, my mind was made up. Unlike Rich - who had committed to a full-on propane conversion kit - I opted for a bi-fuel system (I have committment issues). I sometimes travel out-of-town with my truck, so I wanted the option to run gasoline just in case I ran out of propane and none was available. In addtion, the bi-fuel conversion kit is actually cheaper than the full-on kit!
First off I'd like to say that Cary at
gotpropane.com
was not only knowledgeable, but was friendly and willing to talk to me about any issues I had with this kit. During the installation process I called him at least a 1/2 dozen times. You may find cheaper kits out there, but none with the quality or tech support of the
gotpropane.com
kit. All the components are top-of-the-line and tech support is second to none. That said...
Installing the kit
The instructions say to install the tank first, and then the bulkhead. I had a problem with both of these because:
B. I wasn't sure where I was going to install it/them.
Cary recommends forklift tanks and for good reason! He also recommends mounting them in the truck bed. I had looked around craigslist for propane tanks and found a pair of 10 gallon tanks for $40.00 (which I later found out were the wrong type). Forklift tanks are expensive, so I decided to give these cheaper tanks a try. The first thing I noticed with the new tanks was the interface (hook ups). They were different from the connector in the propane kit. Not a problem. Being a smart guy (or so I thought), I figured I would just purchase the correct adapter. Here is where my plan fell flat on its face. I learned (the hard way) that there are two kinds of propane; vapor and liquid draw. The liquid draw tanks have a siphon hose that goes to the bottom of the tank. The vapor draw tanks do not. The quickest way to tell the difference is the liquid draw tanks require a large, round coupler (on the hose) that tightens clockwise onto the outside of the tank valve's threaded journal. This is a common forklift interface. The vapor draw tanks require a coupler (on the hose) that screws on *counter-clockwise* (reverse thread) on the INSIDE of the threaded journal (like your BBQ grill). Apparently these 2 types of propane are not interchangeable - hence the different connectors. Live and learn... I think it's worth mentioning that my truck DID run on the vapor type propane. However, there were issues. I'll spare you the details. Just know that you MUST use a forklift tank with this kit. The clue is the "regulator" (which I think should be called a "vaporizer"), which converts liquid propane to a vapor. So it makes no sense to hook up vapor propane. I think Cary should include the difference between vapor and liquid propane in the FAQ section of his website. For cheap guys like me who are always thinking outside the box, this would've been good information to have from the get-go. I'm just glad I didn't hurt my new engine...<:^)
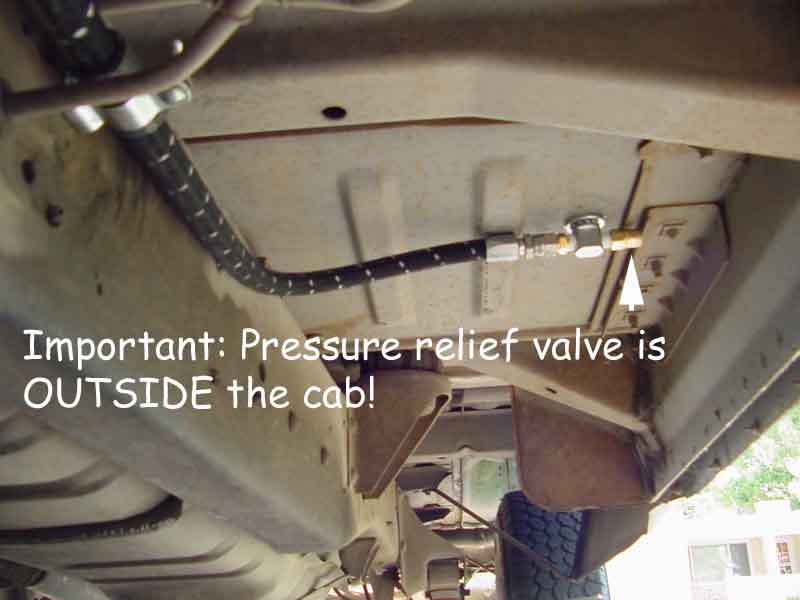
The other issue was where to mount the tanks. Every user-installed propane kit locates the tank on the outside of the vehicle (usually in the truck bed). I assume that this is to idiot-proof the safety process. A sloppy, leaky installation won't asphyxiate the driver since all the hoses, tanks and hardware are located outside the vehicle's cab. Professionally installed kits locate the tank in the vehicle with the driver. So I know it can be done. Since I need every inch of room in my truck bed for sound equipment (I own a
sound company),
I have installed my forklift tank in my cab. Since I know what propane smells like and understand the dangers, I have routed all purge vents to the ouside of the truck. So far I have detected no leaks (soapy water test) or rogue propane (nose test) in the cab. In addition I did an underwater test on the tank and connections by filling a trash can full of water and dunking the propane tank while still connected to the truck. I also purchased a propane/gas detector that will be installed soon (pictures will be posted here post-installation). We'll see how it goes. On the upside I was able to trade those 2, 10 gallon vapor tanks for one used, full forklift tank. So basically I spent 50 bucks for a full, 8 gallon steel forklift tank. After checking around, that's a pretty good price.
Installing the regulator (should be called "vaporizer")
Part 3 of the instruction manual said to install the regulator. I have to say that I wrestled with this a bit. After mulling over several installation options, I decided to install the regulator directly to the wheel well. As you can see in the picture below, this turned out to be an excellent mounting idea. I used every inch of vapor hose for this installation!
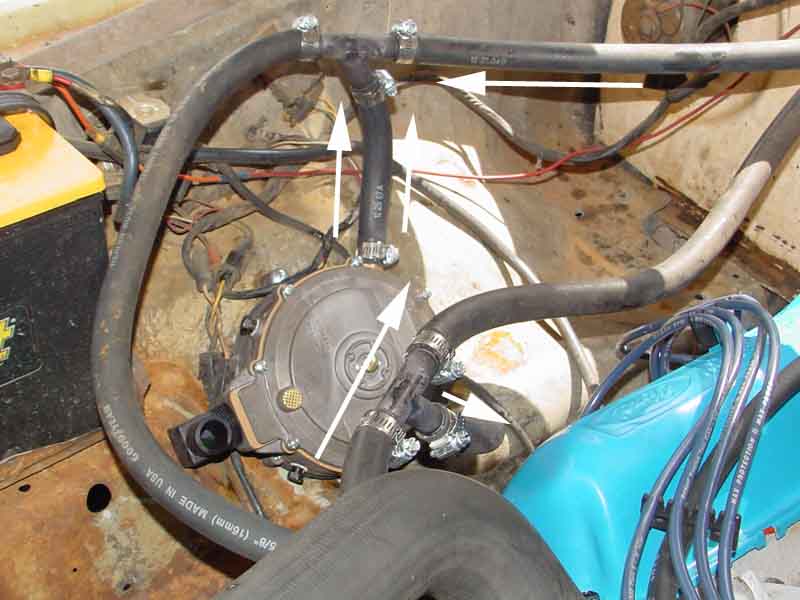
Not only is the regulator mounted solidly, but because of its location, routing propane lines a safe distance from the headers was a piece of cake.
The kewl thing about this bi-fuel kit is you can test-run your engine before the installation is complete. This allows you to check out each phase of the installation as you go along. As you can see in the picture above, the "Y" adapters are installed. I ran the engine to make sure they were water-tight. So far no water leaks (knock on wood).
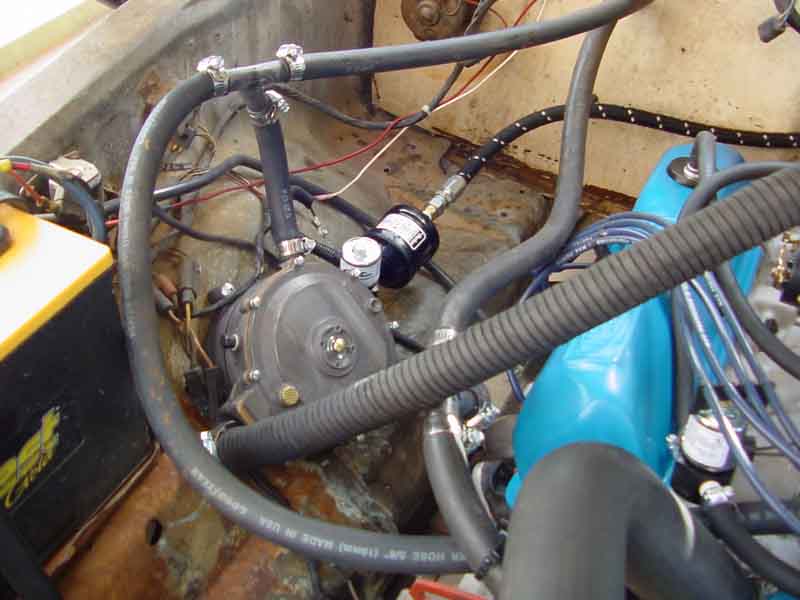
Below is a picture of the regulator with the vapor hose, solenoid, filter and propane line installed:
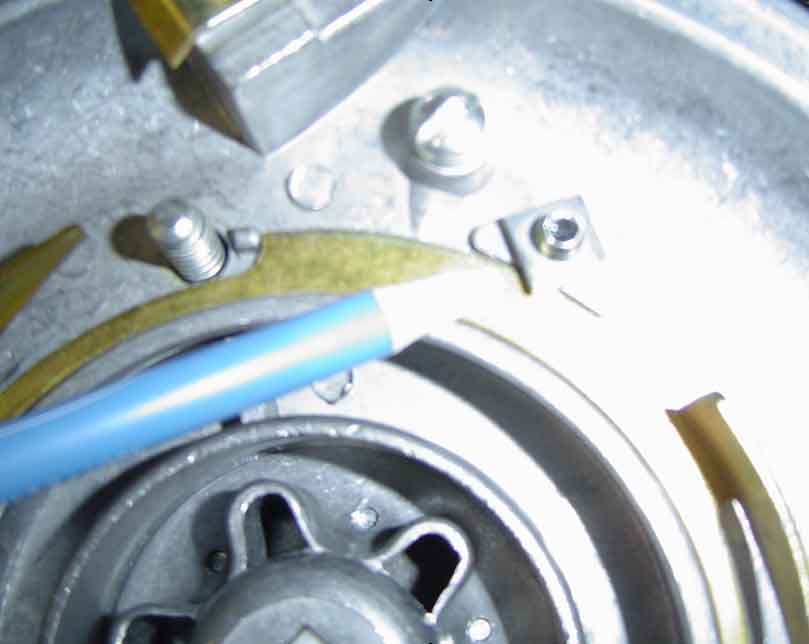
After running the truck on propane for a day, I discovered some blue stuff on the regulator around the vapor hose outlet:
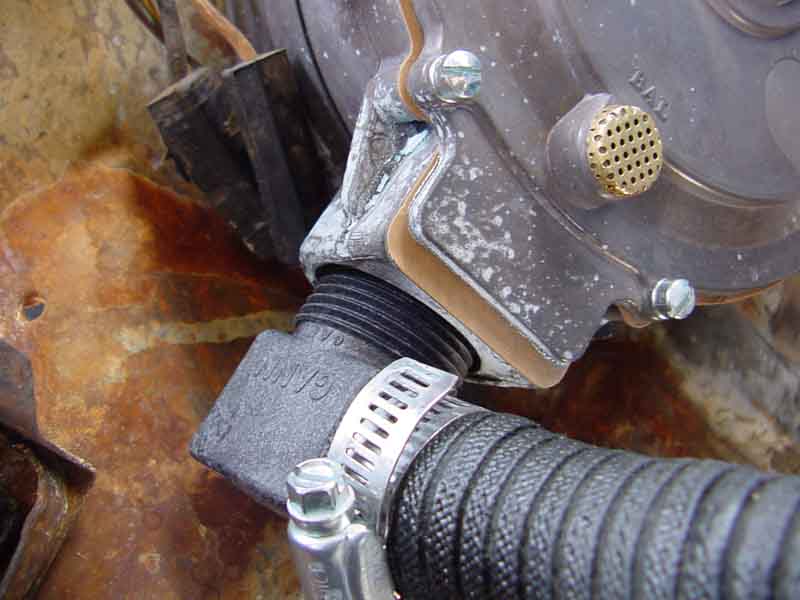
Apparently the stuff they put in propane to make it stink leaves a residue behind. This is a good thing, because it obviously helped reveal a leak that my "soapy water" test did not. Since this outlet housing is plastic, I initially did NOT want to over-tighten it. So I got it about as tight as I thought I could get it with my hands and left it at that. After this picture, I used my 1 and 1/4" wrench to put another turn on the plastic vapor outlet housing. I cleaned up the blue stuff with water. I believe that this should be absolutely air tight now. Time will tell...
The "Y" fittings - "Going with the flow"
Though the included instructions mention that the "Y" fittings must be installed "going with the flow," they don't tell you which way the flow is. I just happend to be a pretty good mechanic so I know that water flows out of the water pump and returns back into the intake manifold. Once one knows the flow of water, one can make logical decisions about how to install the "Y" adapters. As you can see 3 pictures up, water exits the water pump toward the first "Y" adapter (the "Y" adapter at the bottom of the photo). Here the water splits, with half going toward (into) the regulator and the other half going toward (into) the heater core. Water then exits the heater core towards the upper "Y" adapter. Water exits the regulator, as well. At the "Y adapter (towards the top of the photo), heater core water is JOINED by regulator water, which then, together, head towards the intake manifold. It seems that it would be very easy to screw up this phase of the installation.
After installing the "Y" adapters, I warmed up the engine to make sure the regulator would warm up, too. Sure enough, it did. I ran the heater to make sure the heater core was getting water, too. Sure enough, the heater got hot. On to the next phase...
Installing the Mixer Adapter
Installing the Mixer Adapter was pretty easy and painless. However I did find one very important flaw in the instructions. The picture below shows the installer cutting the stud while mounted to the carburetor.
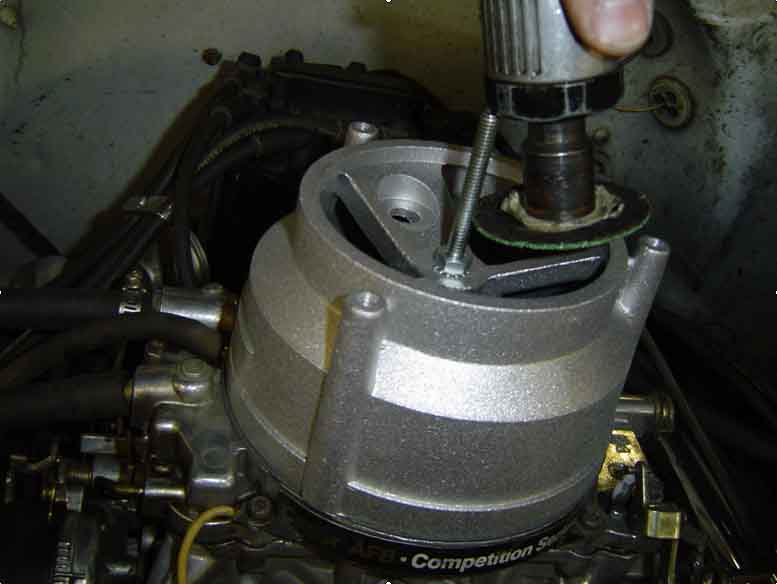
I would NOT do this. This will spread metal bits down through your carburetor which will ultimately travel through your engine. This could potentially ruin your engine. I opted to mark the stud with a pen and then cut to length on my work bench. You'd be wise to do the same!
Installing the Propane Mixer
I had 2 minor quality issues with the Propane Mixer:
1. One of the screws for the vapor inlet was buggered up so badly that I had to replace it with one of my own.
2. It was missing the cable lock screw for the diaphragm cam mechanism (see picture below).
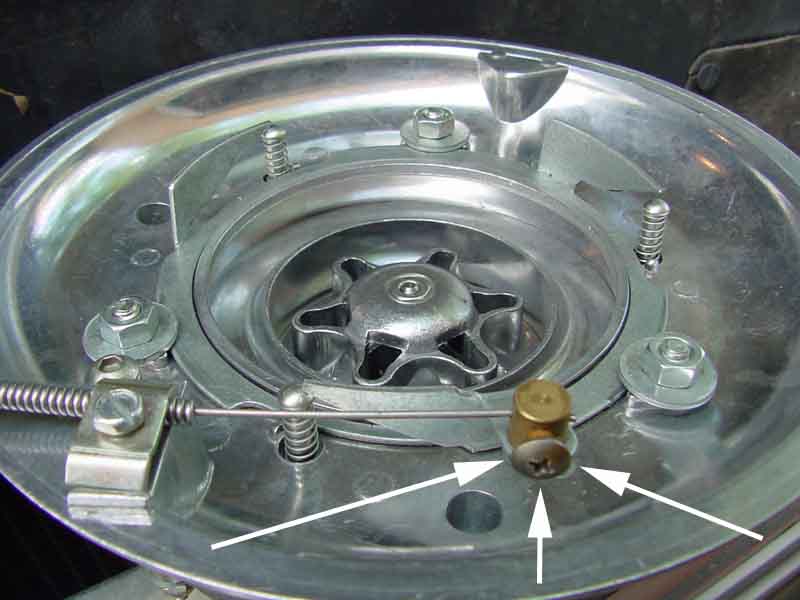
Both screws were easily replaced from my screw bin.
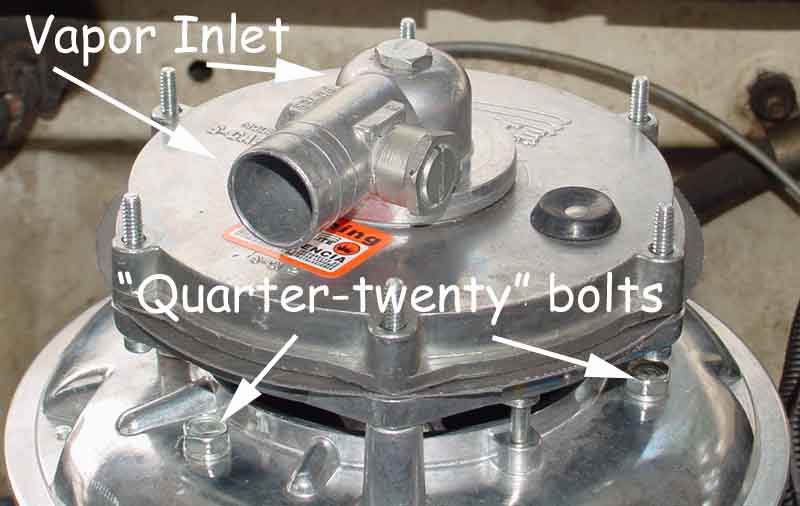
I found another inconsistancy with the included instructions. The instructions say, "Discard the 3 assembly screws." The below picture is shown:
First of all, I think the instructions intended for you to discard the square washers. My unit didn't have screws or square washers. My unit had 1/4" 20-pitch bolts with lock washers, flat washers, and nuts. Your kit will probably have the same. In my case, I discarded the flat washers and nuts. The "quarter-twenty" bolts and lock washers are used to bolt the Propane Mixer to the Mixer Adapter. So don't throw those out! A high-quality silicon gasket is provided. The instructions say, "It is important to have the cable and cam mechanism loosely connected at this time." Though this is true, it is even more important to make sure you have done the following first:
I could imagine someone getting the entire Propane Mixer installed just to realize that they have to take it all apart so they can run the cable through the switch mount and firewall.
Once you have the Propane Mixer installed in a way agreeable with the cam cable, you will probably find that the orientation of the Vapor Inlet is incorrect. In this situation, you will have to reorient the Vapor Inlet. Fortunately, changing the orientation of the Vapor Inlet is pretty easy and painless. Just undo the 3 screws that hold the Vapor Inlet to the Propane Mixer, reorient the Vapor Inlet, and then screw it back down. In my case one of the screws was buggered up, so I simply replaced it with one from my screw bin. One of the great things about this kit is it uses all SAE nuts, bolts and screws. So finding extra screws isn't a problem.
Electrical stuff
First off, I think it's worth taking time to educate people a little bit about electrical switches and circuits. If you look at the switch provided in the kit and think to yourself, "I wonder where the negative goes?" You're in trouble. The only place negative (or ground) wires go are on the solenoids. Otherwise, all wires will be positive.
First thing is to find power. Fortunately solenoids draw very little current, so you can use any fuse in your fuse box and you will not overdraw that fuse. However remember that solenoids do draw SOME current. The only way to avoid draining your battery is to make sure you either shut off the solenoids before you get out of your vehicle, or simply wire the solenoids (and switch) to an "accessory" power source. This means the key must be in the "accessory" or "on" position for your circuit to receive power.
Another thing worth noting is "line" and "load." Since the kit has no in-line fuse, it would behoove the installer to find a fused power source. This can be done pretty easily, but must be done correctly. Please look at the picture below:

As you can see, I have identified the "line" and "load" side of the fuse. "Line" goes to your power source, like a battery. "Load" goes to your device, like a headlight, a horn, or in our case, a switch. To test for "line" and "load," with the fuse removed and the ignition in the "on" or "accessory" position, test both fuse clamps. The "line" side should be "hot." The load side is not. This is important because if you shove the wire in the wrong side of the fuse, your circuit will not benefit from that fuse. When put in the correct side of the fuse, your circuit WILL be protected.
The way to find the line side is easy. Simply remove the fuse and then either meter or test-light both fuse clamps. One will be hot, and one will not. When you turn your ignition switch off, both sides should be cold. You want to use the fuse clamp that is NOT hot (Load side) to power your circuit.
Now that you have safe power going to your switch, it's time to distribute the power out to the solenoids. Your switch has 3 positions:
As you can see in the picture below, the switch is in the L.P. Gas position. Therefore the bottom wire is going to the "L.P. Gas" solenoid valve. The top wire is going to the "gasoline" solenoid valve. For identification purposes, I chose to use 2 different color wires (white wire is provided in the propane kit).
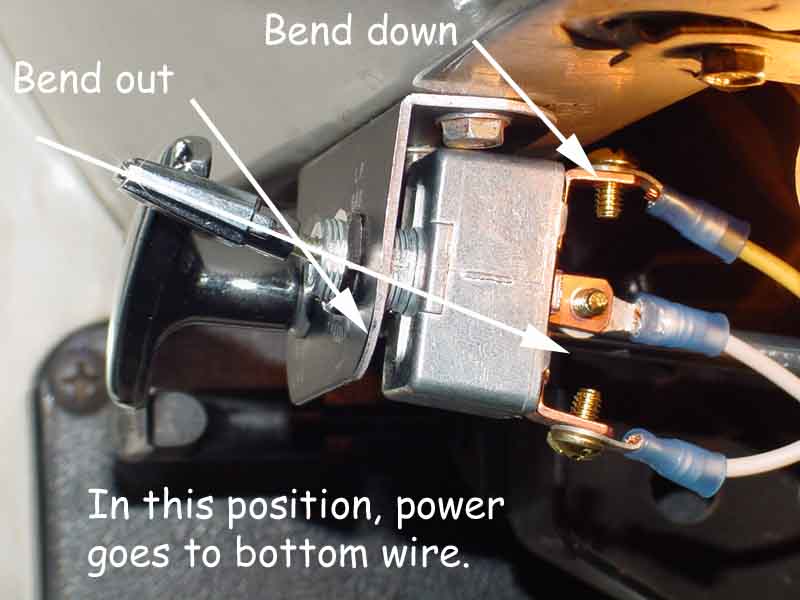
I found that the top switch block (top wire screw) touched my steel dash. This is very bad (short circuit). To cure this problem, I simply bent the switch housing out a bit and the switch block down (as noted in the above photo). Since I did all the wiring with the ignition off, I didn't pop the fuse. Had the ignition switch been in the "on" or "accessory" position, the fuse would've blown as soon as I moved the switch to the "Gasoline" position.
Since the solenoid valves have 2 wires each, one wire is grounded, the other goes to the above switch. Since the solenoid valves are not polarity sensitive, either wire can be ground or power.
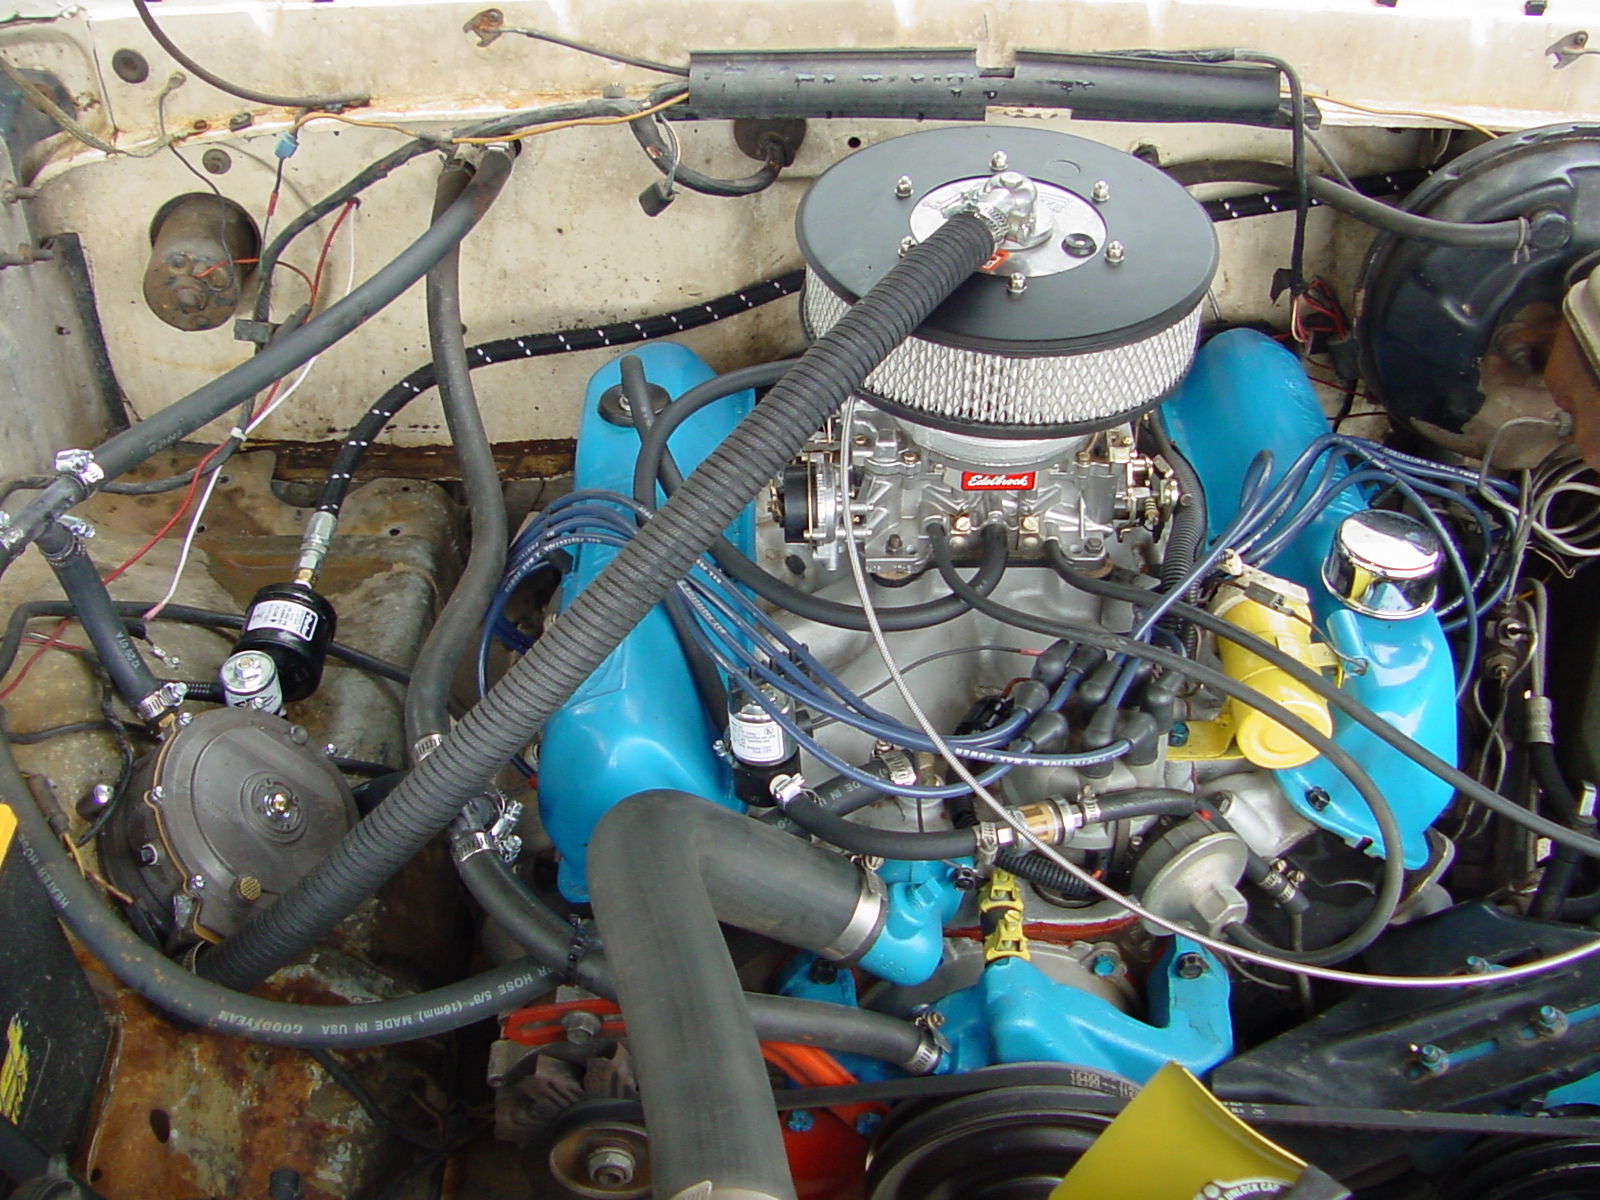
Installing the air cleaner and hoses
Installing the air cleaner was easy. Simply remove the top 6 nuts and washers off the Propane Mixer, install the gasket, the filter, the cover, and then re-install the nuts and washers.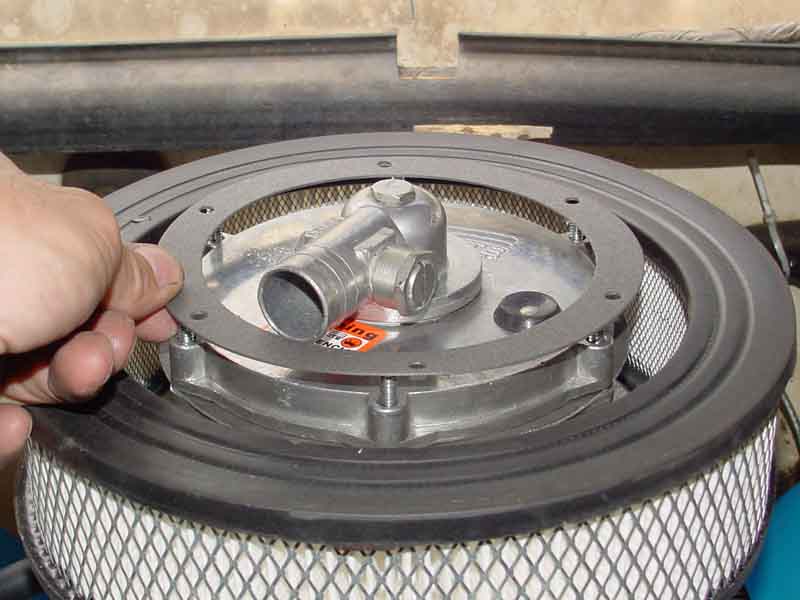
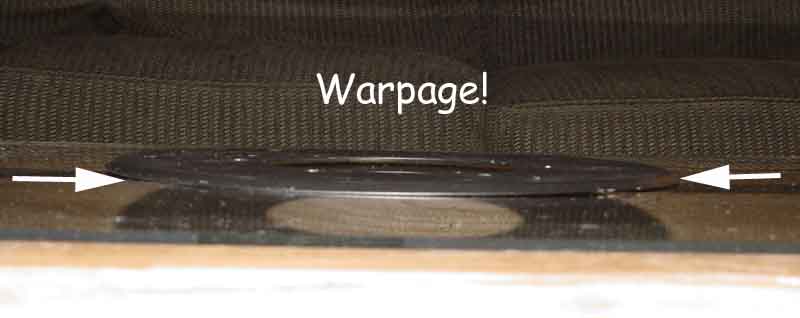
I had another slight issue with the air filter cover. It had gotten a little bent in shipping, so I had to kind of straighten it out. Despite my best efforts, I never did get the thing perfectly straight:
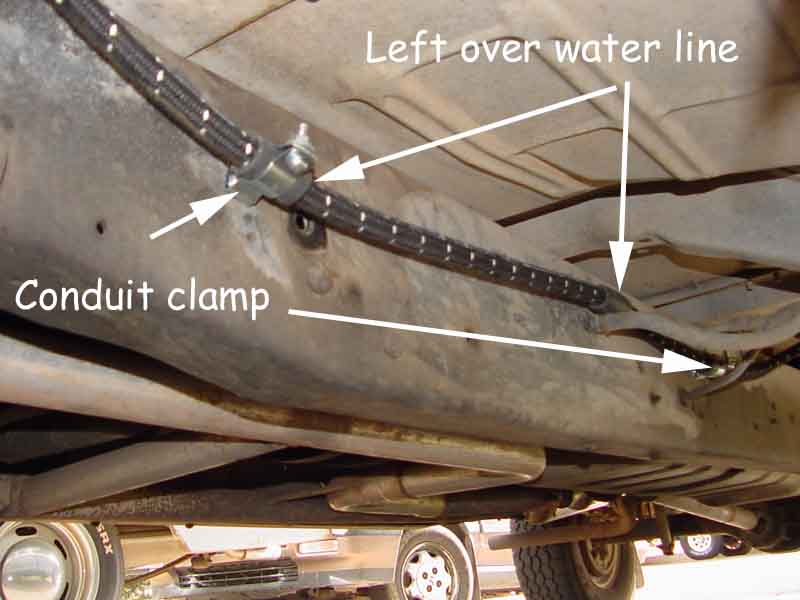
Installing the propane lines
Installing the lines was fairly easy. I made sure that they cleared the exhaust components by at least 8" (directions say 6"). I used conduit clamps for support and spare water hose as an insulator. The directions say, "The hose must be mounted every 6"." I think what they meant is that the hose must be supported every 6". I did not support my hose every 6". This seems like an overkill to me. I supported it about every 24".
Mounting the bulkhead
Again, this was a fairly simply operation because I have large drill bits. My guestimate as that you will need a 5/8" drill bit. Hopefully you either own one or have a neighbor (like me) willing to loan you one. My bulkhead goes up into my cab, but you will probably mount yours to your truck bed.
Performance
As far as performance goes, I'm going to say that propane is pretty close to gasoline. I noticed a slight loss, but nothing to write home about. I still believe that there's enough horse power to take me up a long hill with a heavy load. If I find that there's not, I'll just switch back to gasoline. My findings are on par with the
Department of Energy's findings.
I normally burn regular unleaded. Since my truck's 390 CID engine utilizes stock compression (9:1?), it is not reaping any performance benefits from propane's higher octane rating. I'm toying with the idea of boosting compression, but haven't really decided if I want to go that route yet.
Economy
As of this writing I have limited mileage data, but here are my findings so far:
I know that comparing a full load on the highway to no load in the city is like comparing apples and oranges. But these are my findings, which seem to be consistant with the
Department of Energy's findings.
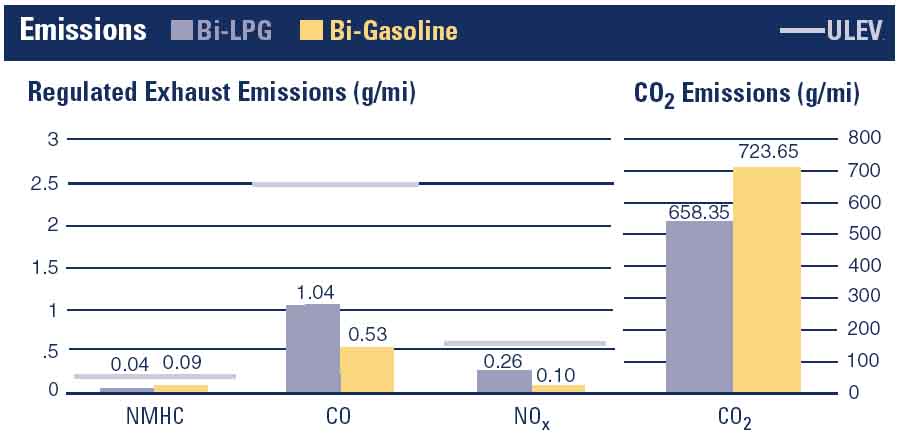
Emissions
Since I don't have a lab, I'll just show you what the
Department of Energy's findings
are. Here's a chart I took out of one of their .pdf documents. Tests were done on a 1999 Ford F-250. Note that LPG emissions are much lower than that of gasoline:
In conclusion
Though the installation of this kit is fairly straight-forward, it is not idiot-proof. If you are not mechanically inclined AND electrically savvy, I would NOT take on this project. I took my time installing this kit so it took about 2 days to finish. Since Cary doesn't answer his phone on the weekends, I did the installation during the week so I would have access to tech support. I found the overall quality of the kit and its components good. I feel good knowing that the kit has been used and tested by an experienced propane person like Cary at
gotpropane.com.
. In addition the tech support was VERY good. No need to decipher a heavy, East-Indian accent.
I have not shown the tank mounting because I haven't actually mounted it yet. Look for a "tank mounting" section to appear soon.
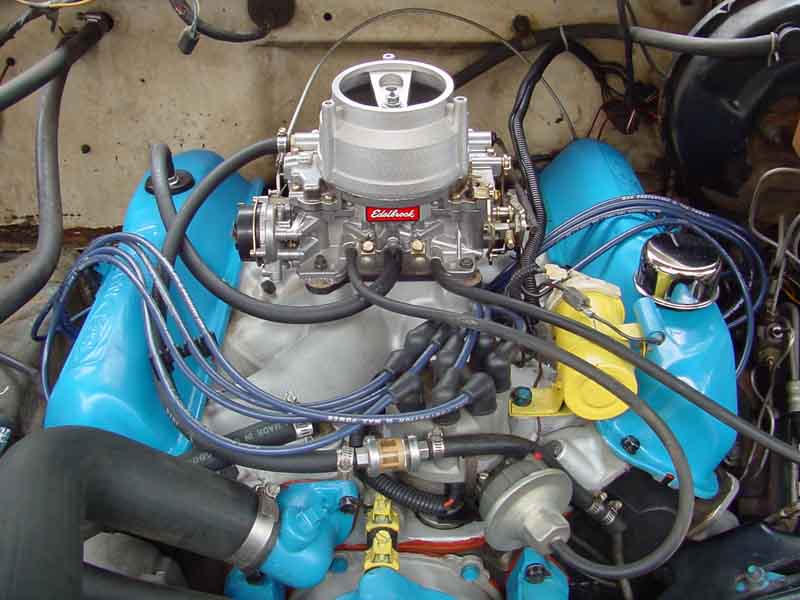
Here is a picture of the finished project:

e'mail me.


All pictures & material Copyright © 2008 Donnie Frank