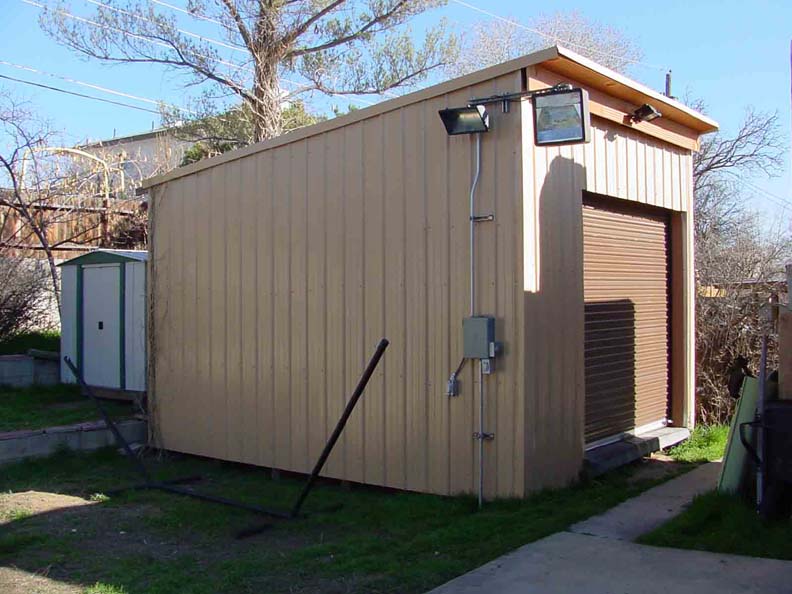
Here's my Storage Shed
Here's another interesting project. This shed took years to build - not because it was that great of a project, but because there was a 2.5 year lag between building the foundation and then actually continuing construction, and then another couple years before electrical service was added. Actual construction time was about 4 months.
How this project got started...
This project started because of a bunch of 4"x 4"x 6' wood planks (4x4's) I found on the property when I first purchased my house back in '96. Originally there was a very ugly, green, prefabricated shed located in the Northwest corner of the back yard (caddy-corner to where this new shed lives). In that old, junky shed I discovered about 16 or 17, 4"x 4"x 6' planks of wood. For a couple years that wood stayed in that old shed until one day I decided I was going to use it as the foundation for a new shed. Where I live you need a permit to pour a cement slab. Since I had this wood anyway, I decided that I would build my shed on wooden pylons - this required no permit. Keep in mind that I have no background in construction. I winged this project from the get-go, and learned as I went. Tools used were a T-square, a circular saw, string, a measuring tape, a chalk line, and 2 screw guns. Not a single nail was used on this structure. It was built entirely of screws.
Phase I - Building the foundation...
How does one build a foundation? I thought about it a bunch before I decided to start building (measure twice, cut once). Since I had roughly 100' of 4"x 4" wood, I decided to do some basic math to come up with some construction figures.
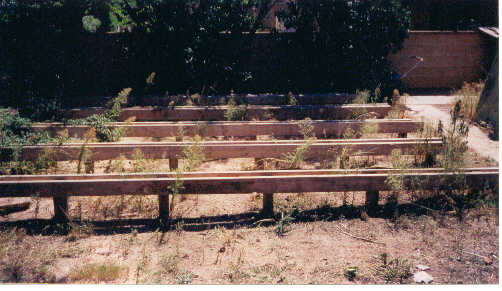
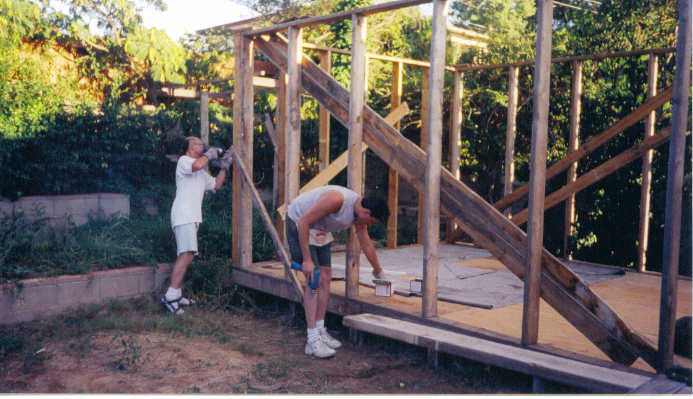
Based on the fact that I wanted as large a shed as possible, and based on the amount of room I had in the back yard, I decided to go with a 15'x 12' shed. I figured that if I spaced the pylons 3' apart, I would need 30 of them for a 15'x 12' shed. I figured I would cut 30, 3' sections of 4x4 out of 15 of the 16, 6' sections of 4x4 I had stored in the green shed. This way I could bury 2' of each 3' section of 4x4 under ground and leave about a foot above ground. My plan was to dig 2' deep holes, place the 4x4's into the holes, and then fill the holes one at a time with cement. Once a hole was filled, I could then level the 4x4 perfectly straight and parallel to the other 4x4's. I did the 4 outer perimeter pylons first so I could use a string to set the remaining pylons in place. This proved to be a good plan. By lining the pylons up in this fashion, I was able to connect all the 4x4's together with 2"x 4"'s, and then build flooring on top of that (see pictures below).
These pictures tell a bit of a fib. The original "phase 1" of this project was setting the pylons into the ground. The 2"x 6"'s you see in these pictures weren't actually added until roughly 2.5 years after the pylons had been set in cement. Unfortunately I have been unable to find pictures of just the pylons and the holes. I believe I did take pictures of the original holes and pylons, so I will post them when I find them.
The politics of free wood...
One event that kicked this project in the butt and took it out of its 2.5 year slumber was a demo project at Intel. Intel was making a bunch of changes to its support buildings (known as Jurrasic Park for those in-the-know). Consequently a lot of buildings were demo'd (short for demolished). The byproduct of this huge Intelian (tm) demo project was a ton of wood in the form of 2"x 6" planks. There were piles and piles of them as high as an elephant's eye. When I looked at this "junk" wood, I saw my new shed. I think I remember drooling.
Anyone who's ever worked at Intel knows what a PITA it is to get anything done around there. They have protocols, rules and conventions set in place, designed to keep us all safe from ourselves and all the bad of the world. Normally carting away "junk" wood would be a welcome event for any company; The wood is recycled, the original company doesn't have to pay someone to cart it away, the new owners of the wood save some money, and the environment receives less negative impact from tossing perfectly good wood onto a garbage heap. Everyone wins...everybody's happy, right? Normally, yes...but not at Intel.
Being that I had worked at Intel as a subcontractor for 5 years, I knew better than to simply try to cart the wood away. I knew the rigmarole I would have to go through to get approval from the powers-that-be before rescuing this wood from the junk yard. I also knew that I should get this approval in writing. Dealing with Intel bureaucracy is on par with any government faction, including the DMV or our judicial system. What would normally take minutes in the private sector can take days or weeks at Intel. I knew if I wanted this wood, I would have to get started getting permission right away.
I was working 4, 10 hour days at Intel which left Friday open to find out who had the authority to grant permission to cart this wood away. The logical step seemed to ask the guy in charge of all waste on the Intel site - we'll call him Joe. According to Joe, he was in charge of such things, and he saw no problem with me carting the wood off site. Not being satisfied with Joe's claim of authority, I prompted Joe for his boss' name - We'll call this boss guy "Bob." I went to Bob and got his permission. I then went to Bob's boss, who we'll call Dave, and got his permission. Noone was willing to give permission in writing. They all said that I was being entirely too anal about all this, to just take the wood. I laughed on the inside. I knew better.
The next day, Saturday, I pulled up to one of the piles of wood with my truck and a hammer. Tons of nails were left in the planks and had to be removed in order to facilitate stacking. The plan was to take a few hours to fill the bed of my truck with neatly stacked wood planks, and then be on my merry way.
Important side note: Normally getting my old truck on the Intel site would be an impossible task because of insurance and liability issues. However, by a sheer stroke of luck, Intel had changed its construction borders so all the wood, though still on Intel property, was off the Intel construction site. This meant that physically getting to the wood would not be a problem.
After 3 hours of selecting the best wood planks, removing all nails, screws and other sharp objects, then stacking the planks neatly in my truck, I was ready to go. Not a soul had bothered me the entire time. Perhaps Bob, Dave and Joe were right??? Maybe I was being too anal...
After taking a drink of water and wiping the sweat off my head, I headed toward the cab of my truck, happy that I had filled the bed with enough wood to build my entire shed. As I was heading toward the front of my truck I was met by a couple of security guards in a golf cart. One of them said, "What do you think you're doing?" I replied, "I'm getting in my truck and leaving." "Not with all that wood you're not," he replied. I said, "It's okay, I have permission from Bob, Dave, and Joe." "Hmmm...we're gonna hafta check on this." (Believe me when I say that the thought of getting in my truck and just leaving had crossed my mind. Unfortunately I felt that the folks at Intel would get my license plate number, trace it back to me, find the company I worked for, talk with my boss and have me duely terminated. Since losing my job was not my objective that day, I decided to comply with the security guards.)
Though this delay was annoying, I wasn't worried. Permission-wise I had my ducks in a row. Unfortunately, being Saturday, neither Bob, Dave, or Joe were at the Intel site. I still wasn't worried.
After what seemed like an eternity of radio banter, one of the security guys says, "You're going to have to come with us." Again, the thought of just taking off crossed my mind - especially the way they said that I was going to have to go with them. Anyone who knows me knows that this was a volatile situation. Not only do I have a real problem with authority figures, AND anger-management issues, but I really can't stand it when I have to do something 2 or 3 times because of someone else's screw up - in this case, not letting the weekend crew know that a guy would be coming by to cart off some wood. However I do know which side my bread is buttered on. Not only had I spent 3 hours preparing and stacking this wood, but I knew that these 2x6's would cost at least 10 bucks a pop at the hardware store. I had over 50 of them stacked in my truck. After careful consideration, I concluded that a little ass kissing was better than not having the wood. Without saying a word I locked up my truck and got in the back seat of the golf cart.
Upon arrival to the main building we were met by a gentleman who obviously wasn't a security guard. He looked at me and said, "Who are you?" I gave him my name and the company I worked for. "You know you're not supposed to be taking refuse off the Intel site." I replied, "Yes, normally I know it is policy not to remove materials from the Intel site, however I happen to know that this policy is in place to protect trade secrets. Since wood is obviously not going to give away any technology secrets, I thought I would seek permission from Intel authorities to remove this wood from the Intel site. Also, since Intel has several pro-active recycling policies in place, I figured Intel would be happy to see this wood recycled as opposed be being taken to the dump." He paused for several seconds and then asked me, "Who gave you permission to take this wood away?" I answered, "Joe over in waste management." The Intel guy responded exactly as I knew he would, "Joe doesn't have the authority to give anyone permission to take anything from the Intel site." This was perfect. I was ready with a good answer. "I figured that Joe didn't have authority, so I went to his boss, Bob, and got permission from him." Again the Intel guy said, "Well, Bob doesn't have the authority either." I said, "I had a feeling that Bob didn't have authority so I got permission from Dave. Dave assured me that he had the authority to allow me to remove wood from the Intel site." The Intel guy (let's call him Bill) was obviously getting annoyed with my answers. "Well this is Saturday, Dave isn't here." "I knew he wouldn't be here so I asked him for written permission. Unfortunately he was to busy to do so." Bill paused for a few seconds, looked at one of the guards and said, "Crap...take me out to where this wood is."
A few seconds later we arrived at my truck with the neatly stacked wood laying in the bed. Bill said, "That's a lot of wood. What are you going to do with all that?" "I'm building a shed in my back yard. I just spent 3 hours removing all the nails and screws from those planks." Bill said to one of the guards, "Lemme see your radio." A few minutes later 2 other Intel guys showed up in another golf cart. After a short discussion amongst themselves one of the new Intel guys said to me, "Intel doesn't want this wood recycled, Intel wants the wood to go to the junk yard." 50 smartass responses swirled around in my head like bats trying to escape into the night sky from the confines of a deep cave. I held back my smartass remarks and politely said, "I sure wish Intel would've told me this from the get-go before I spent 3 hours clearing these boards of nails and screws in the hot sun." Finally the first guy, Bill, piped up, "This is ridiculous. Look, just get out of here. You can have the wood that's in your truck, but no more." I said, "Thank you." I sped off with my middle finger flying proudly out the front window...okay...just kidding about the middle finger...hehe...and I didn't "speed" off, either. Intel has a strict policy about speeding...
More free wood...
A good friend of mine, James Micono, used to work for JC Penny's mailing department. JC Penny's mailing department is not what you'd think. One imagines an office or cubicle with 1 or 2 guys putting stamps on boxes and envelopes. In reality the mail department is a HUGE building with dozens, if not hundreds of employees. That said...
One day my buddy James calls me and says, "Do you have any use for 3/4" plywood?" "Are you kidding?" I said, "Heck yeah I could use it." He asked, "How many sheets do you want?" I asked, "How many can I have?" He said, "Well, there's like 100 sheets. I can probably get you 1/3 that." I gladly accepted. "I'll take it!"
The next day I went down and loaded my truck up with 35 sheets of 3/4" plywood. There was a catch, though. Seems this wood had been used as shelving for storage. What James didn't mention was that these 4'x 8''s had been cut down to 3'x 8' sheets. No worries...I would work around it.
Phase II...erecting the walls...
Being as I had all these 3'x 8' sections of plywood, and a ton of 2"x 6"'s, I decided to build the shed on 3' centers instead of the standard 2' centers. In layman's terms this means that the wall studs would be 3' apart instead of 2' apart. Since standard construction was done with 2"x 4"'s on 2' centers, and I had 2"x 6"'s, I figured I could fudge the standard a bit by building on 3' centers. I figured the thicker studs would allow me to spread them farther apart and still maintain the same rigidity.
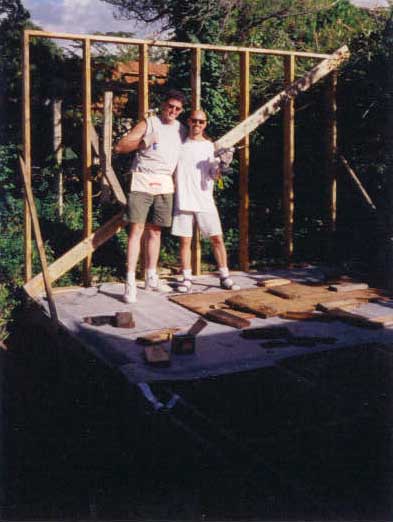
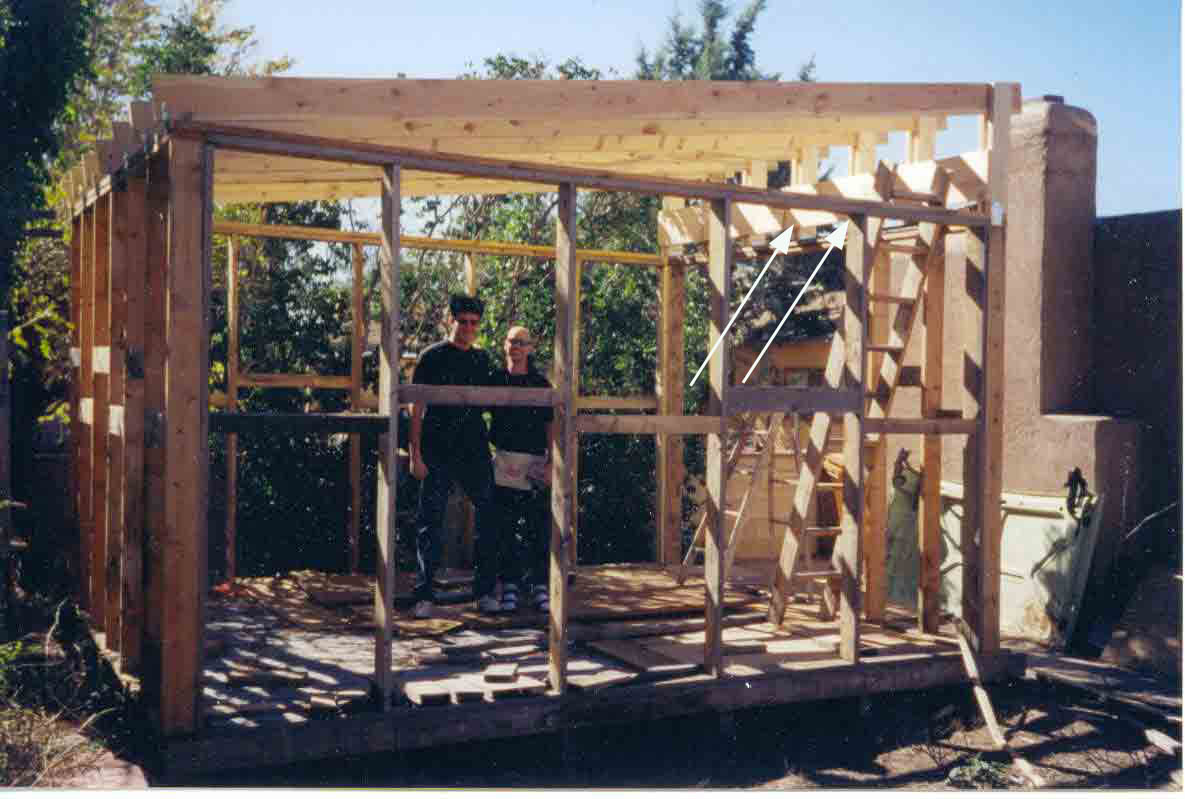
Here's a picture of me with my friend, Jeff Micono (James' nephew coincidentally) after we had laid down part of the flooring and erected the west wall. Jeff is a software engineer out at Sandia Labs here in Albuquerque. Like me, he had no prior construction experience. Unlike me, he is 6'6" tall, so his height really came in handy.
Hard to see is the VERY EXPENSIVE 2" x 12" x 12' board right over the garage door (see arrows). This piece of wood was necessary to securely hold the very heavy-duty roll-up garage door. I'm notoriously cheap by nature, so you can imagine I almost crapped a brick when I found out this single piece of wood was over $30.00. Keep in mind that at this point the only items I had paid for were the screws, the cement, and the garage door itself (which was $400.00). At this point I had less than $500.00 into this shed.
Phase III - Installing the corrugated steel...
I had this roommate named John Smith...no shit...his real name. His brother owned a roofing company and John sometimes worked for him. One month John had a hard time coming up with his share of the rent so he says to me, "I can get some corrugated steel from my brother's roofing company. It would be perfect for covering your shed." I had toyed with different ways of finishing the shed. Honestly, corrugated steel hadn't occured to me. He asked me, "Can we work a deal on the rent?" At first I didn't like the idea, but then I started checking around. I priced out corrugated steel and did some research on its durability, etc. From what I gathered, it seems corrugated steel lasts forever and is very expensive. After doing the research I told John I would think about his proposition. A couple days later John sweetened the pot by adding that he would also install the corrugated steel. This was good because I had no idea how to install the stuff. Apparently John's brother had installed this corrugated steel on the roof of a building somewhere here in Albuquerque. The lady paying for the job didn't like the color, so she paid to have them redo the entire job. Since John was lead man on the crew that did that particular job, he was able to take great care in making sure the old corrugated steel was not damaged during removal. Honestly, I think I got a good deal. John did a great job covering the shed. In exchange he got to live at my house for free that month.
Phase IV...Running power to the shed...
The shed existed for a couple years without power. To say the least it was "inconvenient" to have to drag a flashlight out to the shed every time I needed something after the sun had gone down. That all changed in October of 2003 when I moved Julie down to Albuquerque. She brought with her a tall, stand-up freezer which she wanted to plug in somewhere and then fill with food. I was all for this until she started talking about displacing my 80 gallon compressor out of the laundry room. No way, Jose'! Julie then suggested putting the freezer in the shed, which was actually a good idea, except there was no electrical service run out there...yet. So, once again, it looked like Julie was prompting me to start another project...power to the shed.
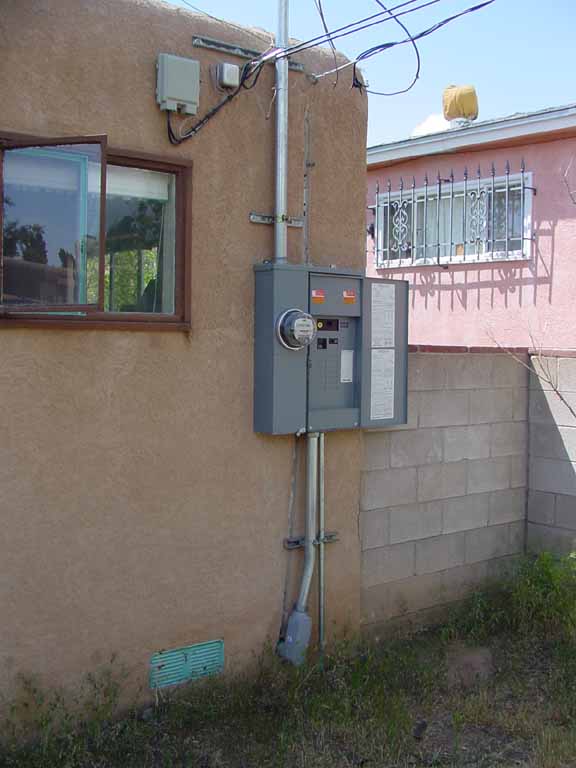
Fortunately I had previously installed a 200 AMP panel on the outside of my home a couple years earlier (another project that will eventually be on my "Projects" page). In addition I had replaced the indoor 60 AMP panel with a modern 100 AMP panel. This left 100 AMP's to play around with. I know 100 AMP's is a lot of power for a shed, but I had plenty of ideas for what I would do with all that power. First off I wanted to improve lighting in the back yard which was presently limited to one, 500 watt lamp installed in the corner of my house, and whatever fixtures on a stand I could drag outside. I also wanted to rewire my table saw to 220VAC from 120VAC. For this I would have to have a 220VAC receptacle somewhere. In addition I wanted to install lighting inside the shed, and of course industrial-grade, 20 AMP receptacles inside the shed for the freezer and whatever else I might want to power. I also figured I would probably be running a welder from that 220VAC receptacle someday, too.
The most expensive part of a project like this is usually the wire, with all other peripherals like switches, receptacles, pipe, etc. coming in a close second. In order to be up to NEC code I would have to run 3, #2 wires (which cost about $1.50 a foot around here), plus a 4th #4 ground wire. I had calculated the run at 50 feet. Doing the math, 50 feet times 4 cable runs at a $1.50 a foot comes out to $300.00 Fortunately for all of us, me being the scavenger I am, I pretty much already had everything I needed. I actually had a few hundred feet of brand spanking new #2 wire left over from a job - where it was never installed - hanging up in the shed. The wire had been there for years. In addition I had tons of industrial-grade receptacles of all kinds (different voltage and amperage ratings) left over from electrical demolition jobs at Intel. This stuff was supposed to be thrown in the garbage (according to Intel policy), but once in a while a 4-gang receptacle would end up in my "personal" trash can. Only Intel would be hypocritical enough to publicly brag about their recycling policies and then admonish (or terminate) an employee for actually employing those policies. What a bunch of crap. Anyway...I digress...
To make this power project a reality, all I really needed to purchase was the panel, breakers, and 1" schedule 40 conduit to facilitate running the wire under ground. All this stuff would cost less than 100 bux. Once again my friend, Drew, was a huge help in getting together little odd-n-ends pieces. Drew is an electrical contractor.
Here's a picture of the 200AMP panel I had installed a few years earlier prior to running the shed conduit. Notice where the old 1 1/4" pipe indentions have been left on the exterior wall? These were replaced by the 2" pipe you see in the picture below.
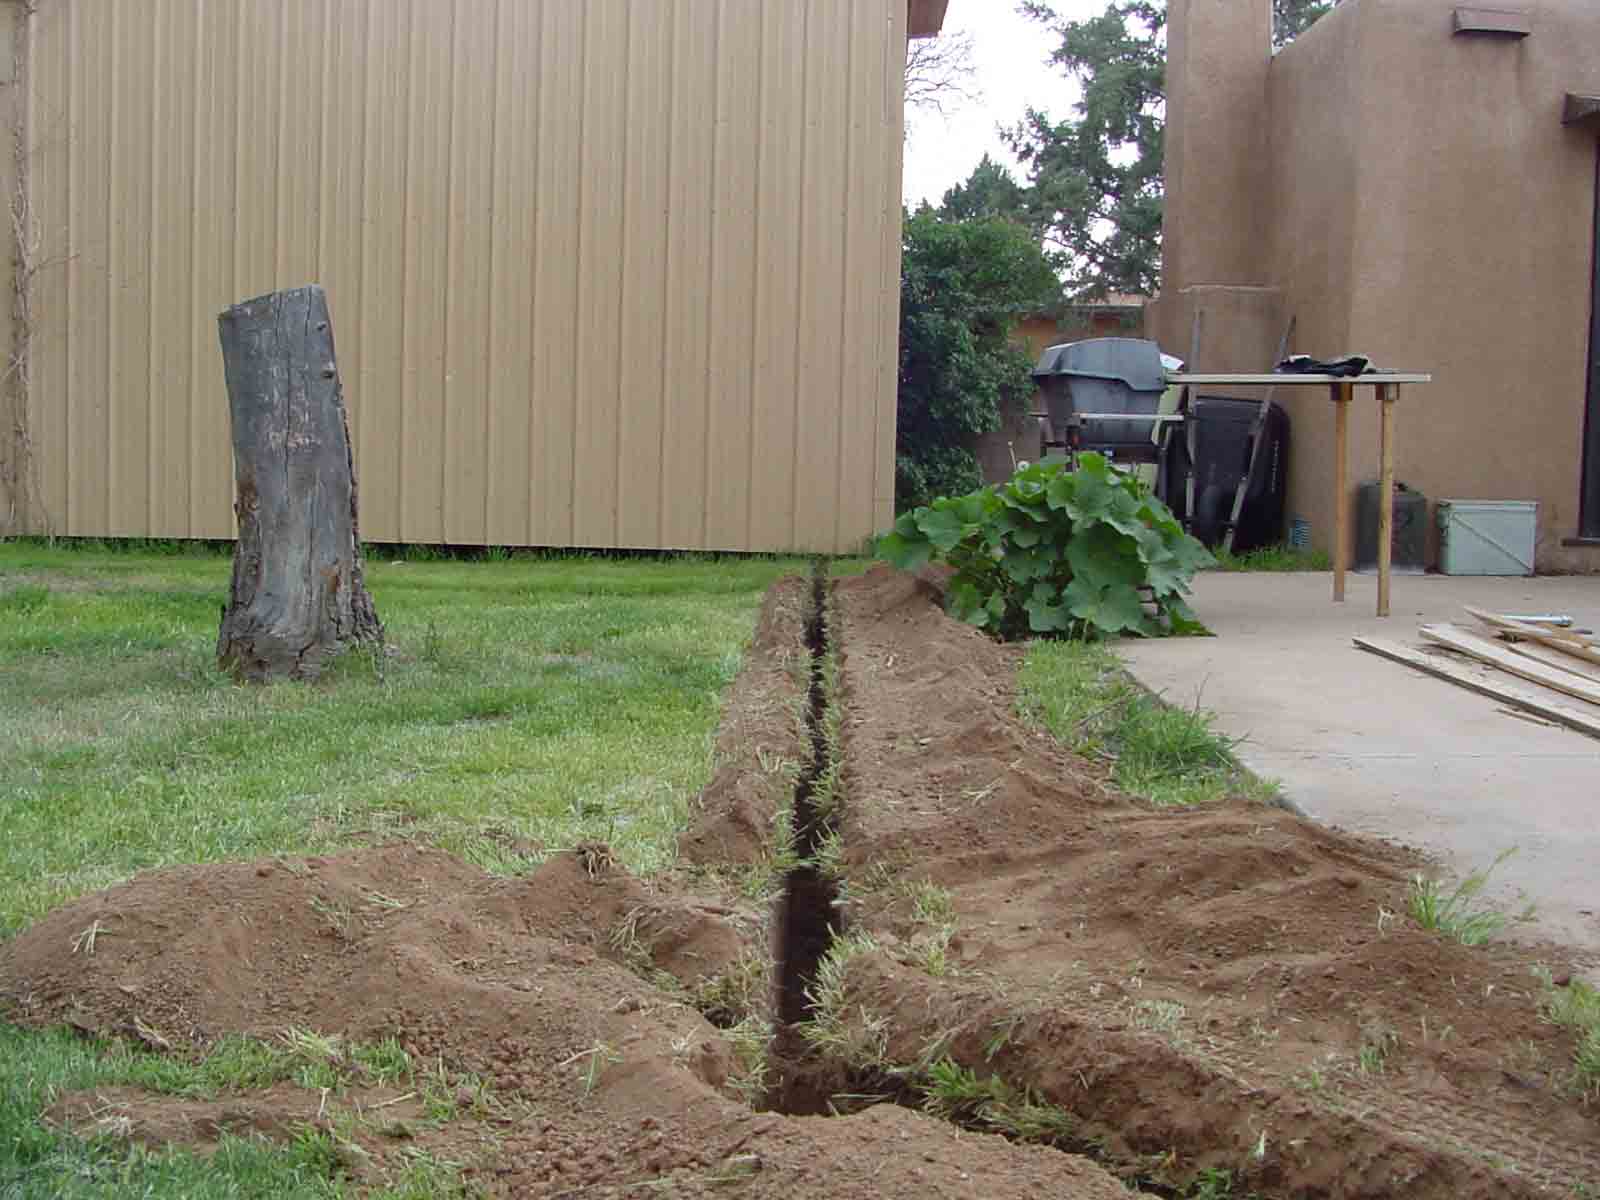
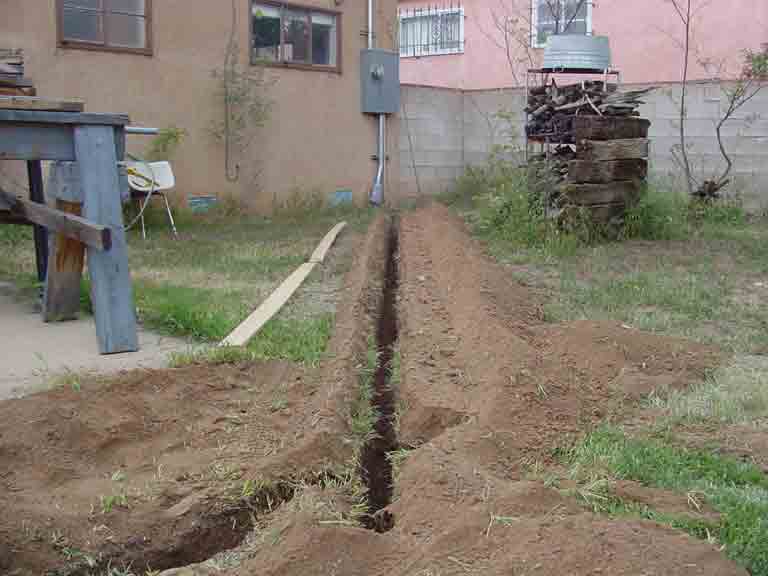
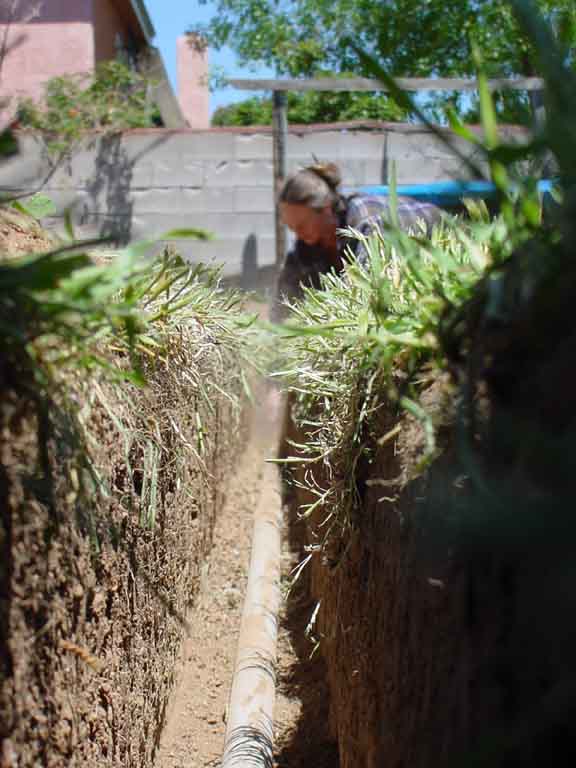
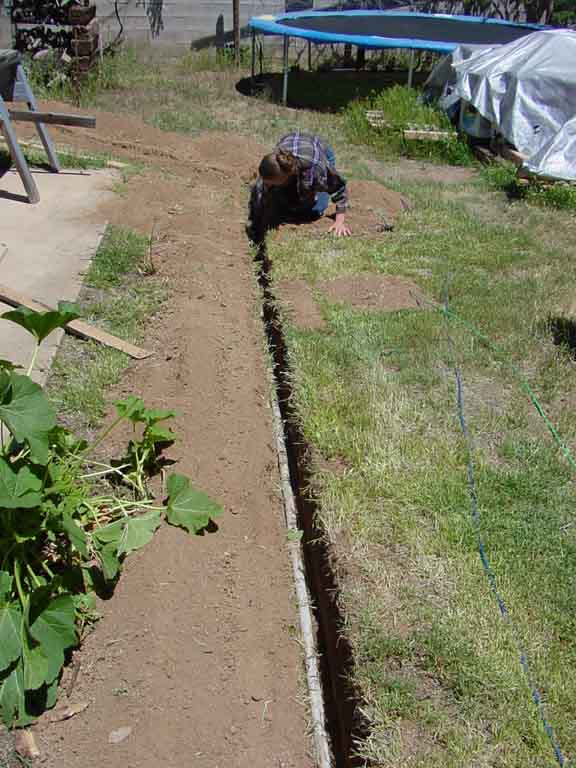
Here's a couple pictures of the nice job the trencher did (notice the tree stump in the left picture just begging for a table!).
Here's an overall picture of the entire trench job with the freezer in the background that started it all.
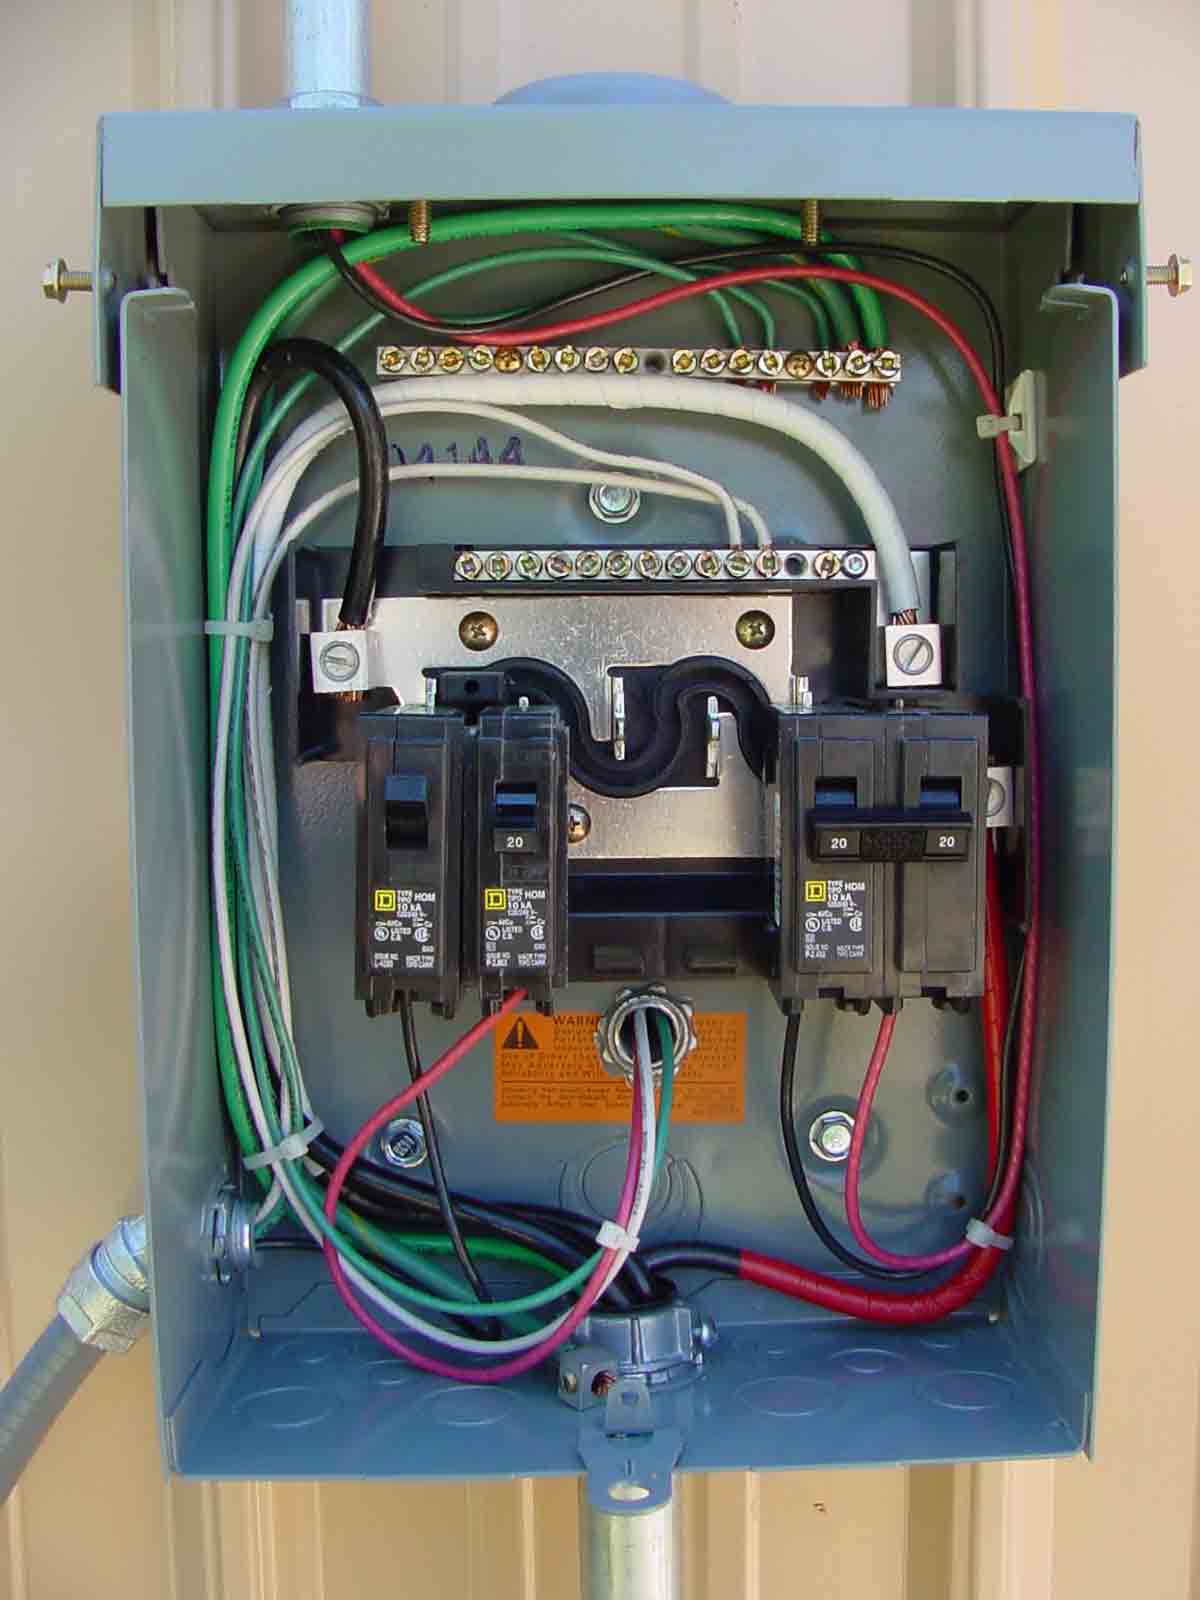
Next was the actual installation of the 100 AMP panel.
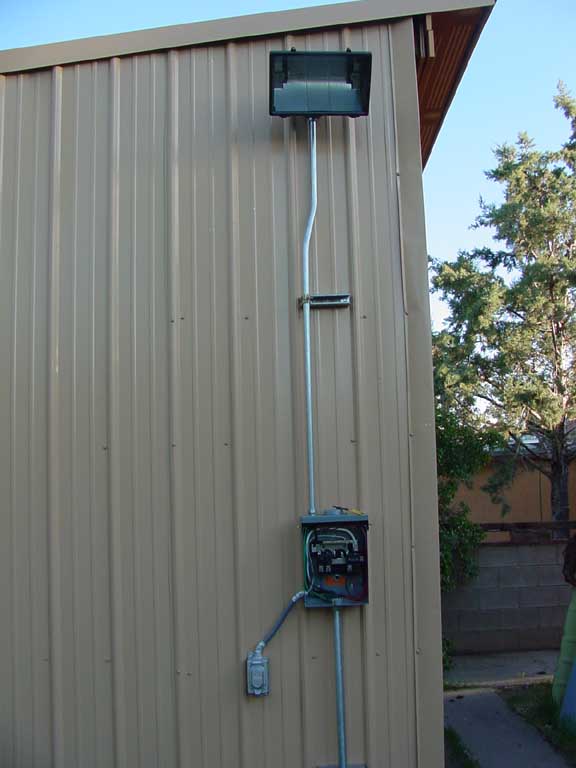
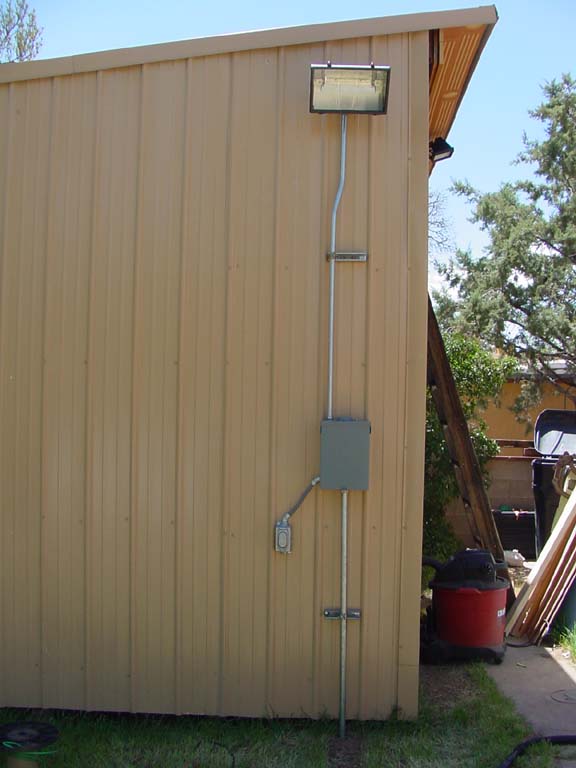
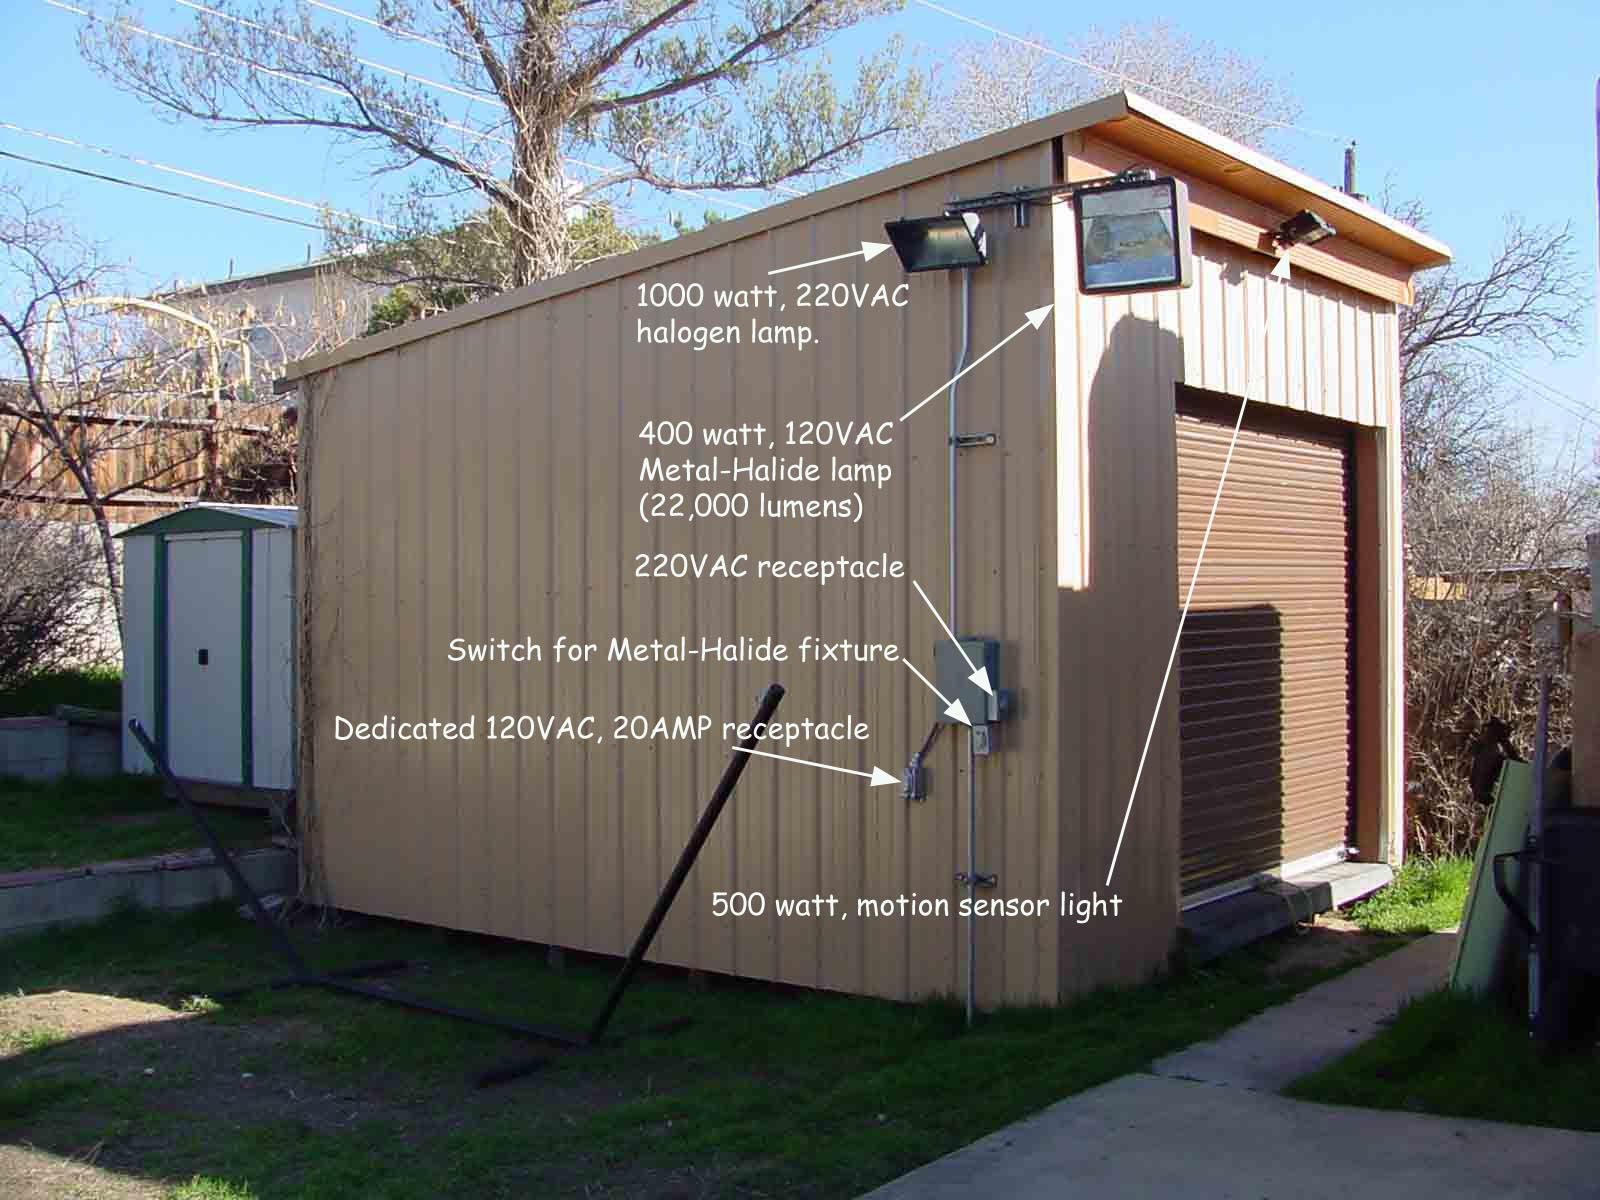
I'm now the proud owner of a very roomy, not-too-bad-too-look-at, shed. Here's a picture with everything labelled.
The reason for having the 1000 watt Halogen lamp right next to the Metal-Halide lamp is that the Metal-Halide lamp requires about 2 minutes to warm up, whereas the halogen lamp provides instant light. The advantage of the Metal-Halide lamp is that for less than half the electricity, it provides 4,000 more lumens of light than its Hologen counter-part. Whenever I need instant light for only a minute I use the Halogen lamp. However if I'm going to be working on an outdoor project for any length of time, I use the Metal-Halide lamp. I got the Metal-Halide fixture (and lamp) on eBay for 50 bux.
This page is up as of March 14, 2005 - 4:PM and was completed March 15, 2005 - 4:PM.
Comments? Corrections? Please
e'mail me to tell me about it.

As you can see I used a level to achieve uniformity across the foundation.![]() The wood was mine.
The wood was mine.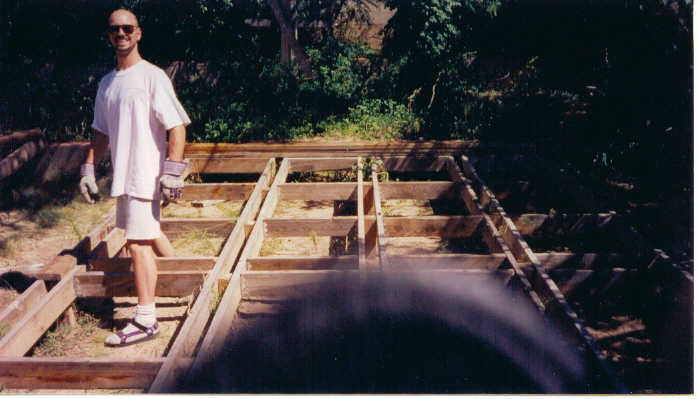
Here's another picture of Jeff and I as we were building the 3rd (North) wall. You may notice the diagonal pieces of wood on each wall. These were set in place to keep the studs evenly spaced and in place. I'm sure there's a better way of doing this, but at the time this was the only method I could think of.
Here's a picture of Jeff and myself after getting all 4 walls up and the slanted roof. I used a plumbing standard of 1" of decline for every 6 inches of horizontal travel. This set the roof at a 15 degree incline. I don't know what the actual roofing convention is, as I have no construction experience. 15 degrees seemed like a good enough slant to me.
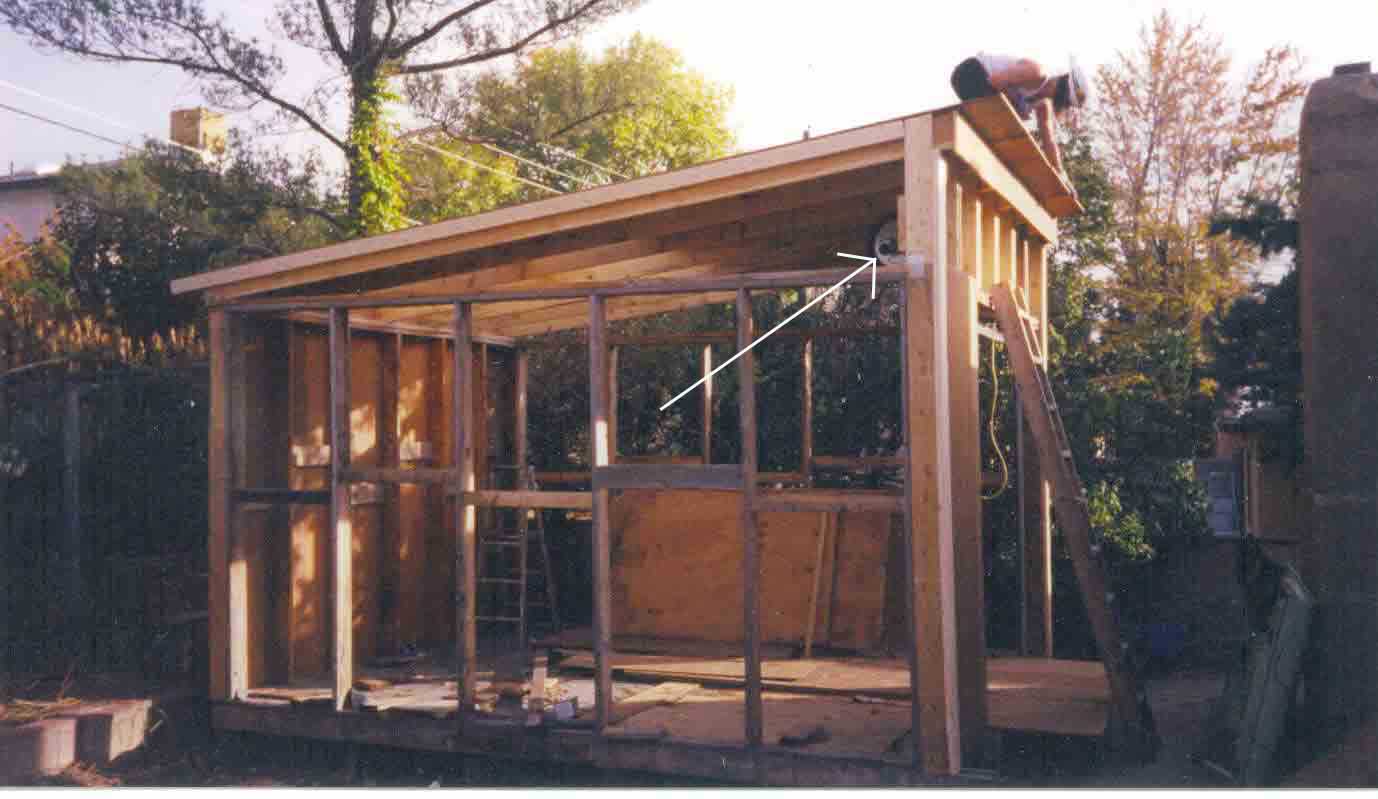
Here I am installing 3'x 8' plywood sections on the roof. As you can see, at this point I have the back wall and the roof pretty much done. If you look carefully you can see the garage door installed on that very expensive piece of wood (see arrow). Early on I decided that I wanted a rolling garage door so I could move large objects in and out of the shed. Many times I have been glad I made this decision. Unfortunately I don't seem to have any pictures that better show the garage door at this stage of construction. The thing weighed a ton and was extremely difficult to install - especially with only 2 guys. However we endeavored to persevere, so we got it installed.
At this point my ex-girlfriend, Mona, and I are taking measurments to cut the side pieces. Since I have no construction experience, I figured the best way to do this was to simply hold the wood up against the shed and have Mona trace a pencil line along the cutting edge. This method proved to work great. Keep in mind all cuts were done free-hand with a Sears Craftsman circular saw. If you're wondering why I'm wearing a bicycle helmet, it's because I kept banging my head over and over and over again. Fed up, I finally decided to wear head gear. This proved to be a great idea as I continued to bang my protected head throughout the project.
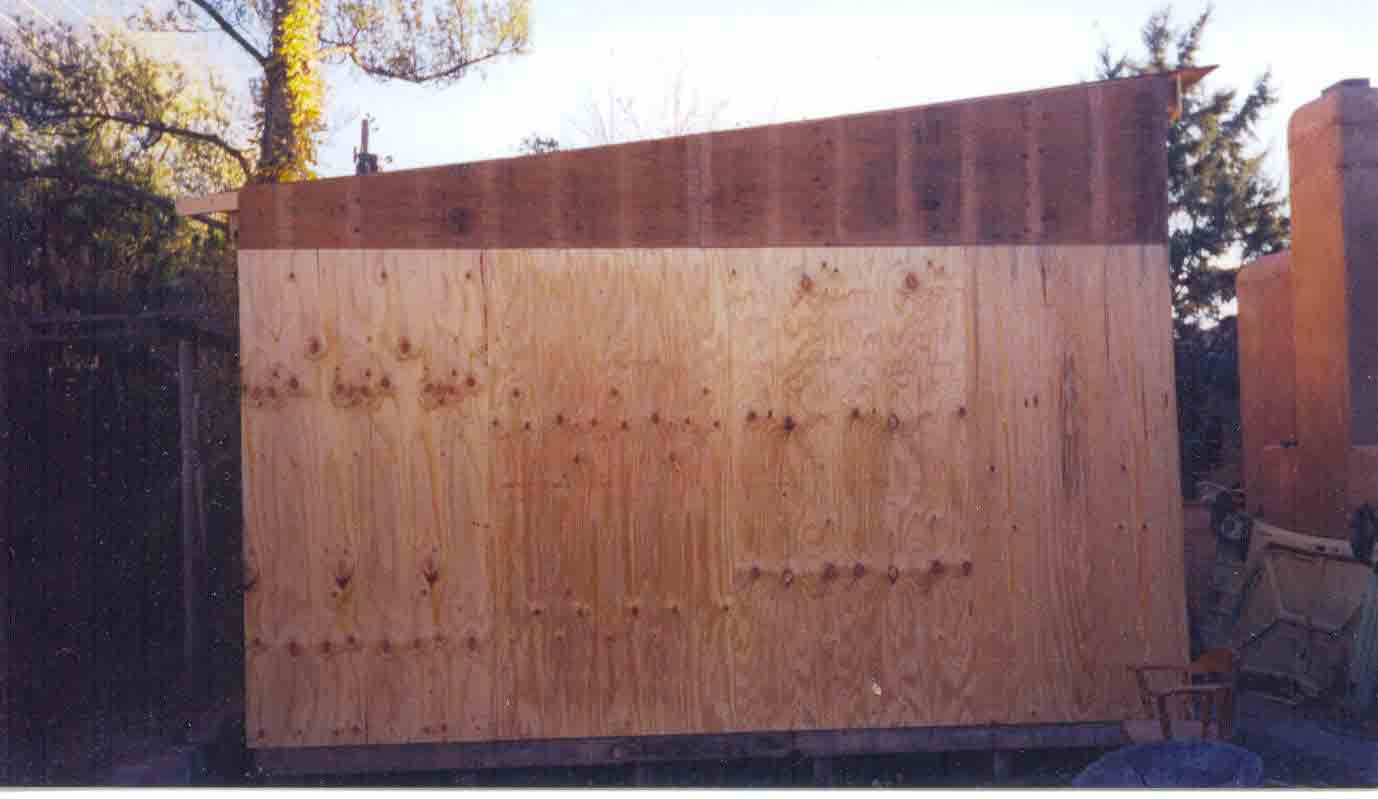
The completed North wall.

The completed West wall.
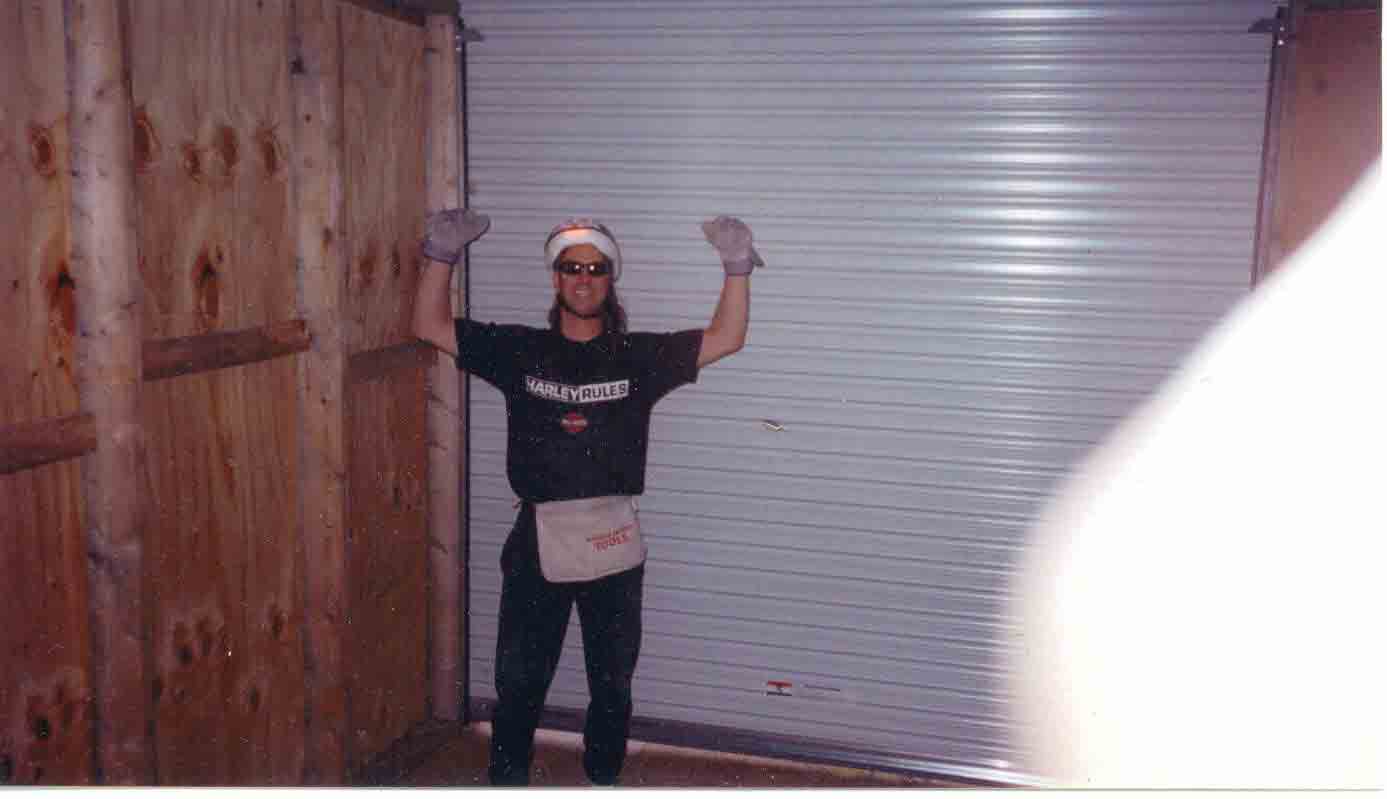
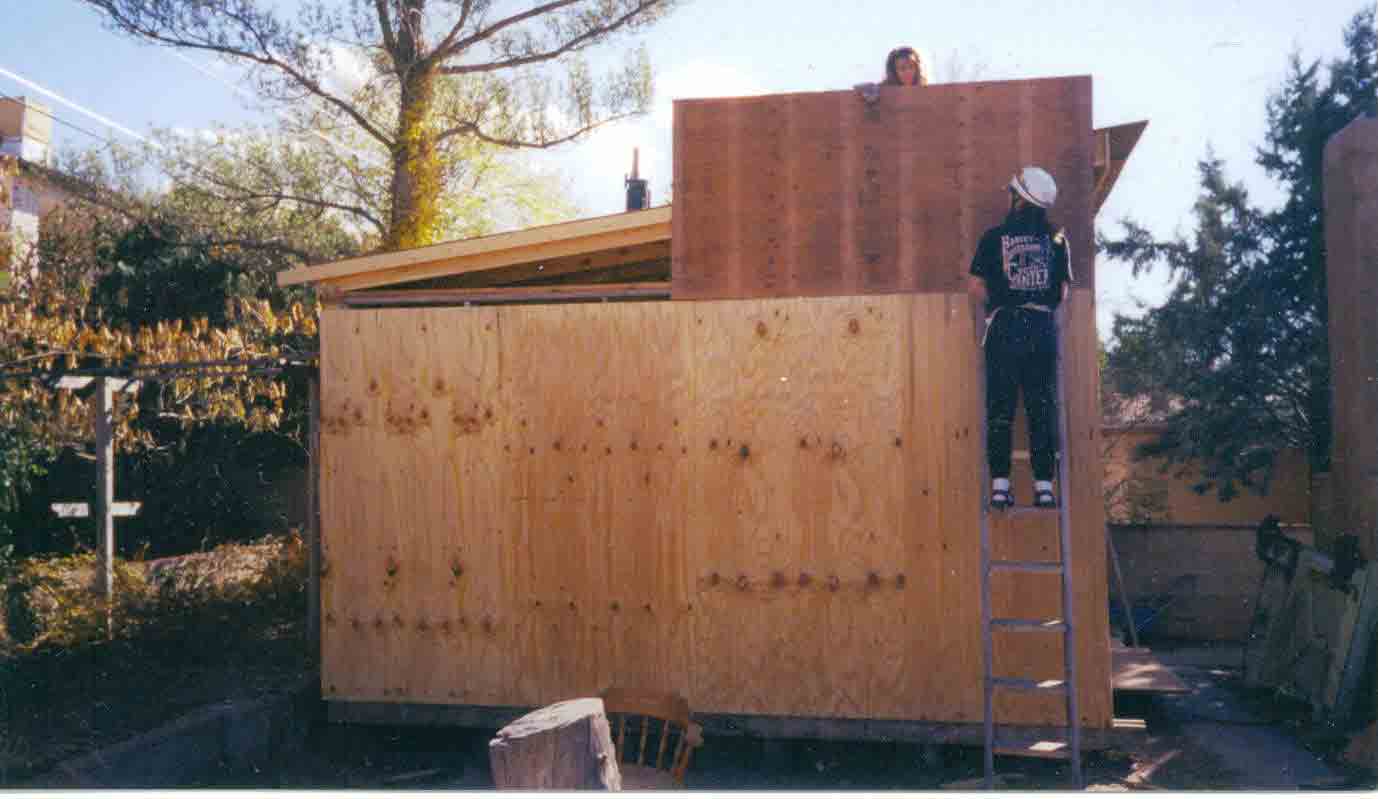
And here is the first picture ever taken inside the shed!

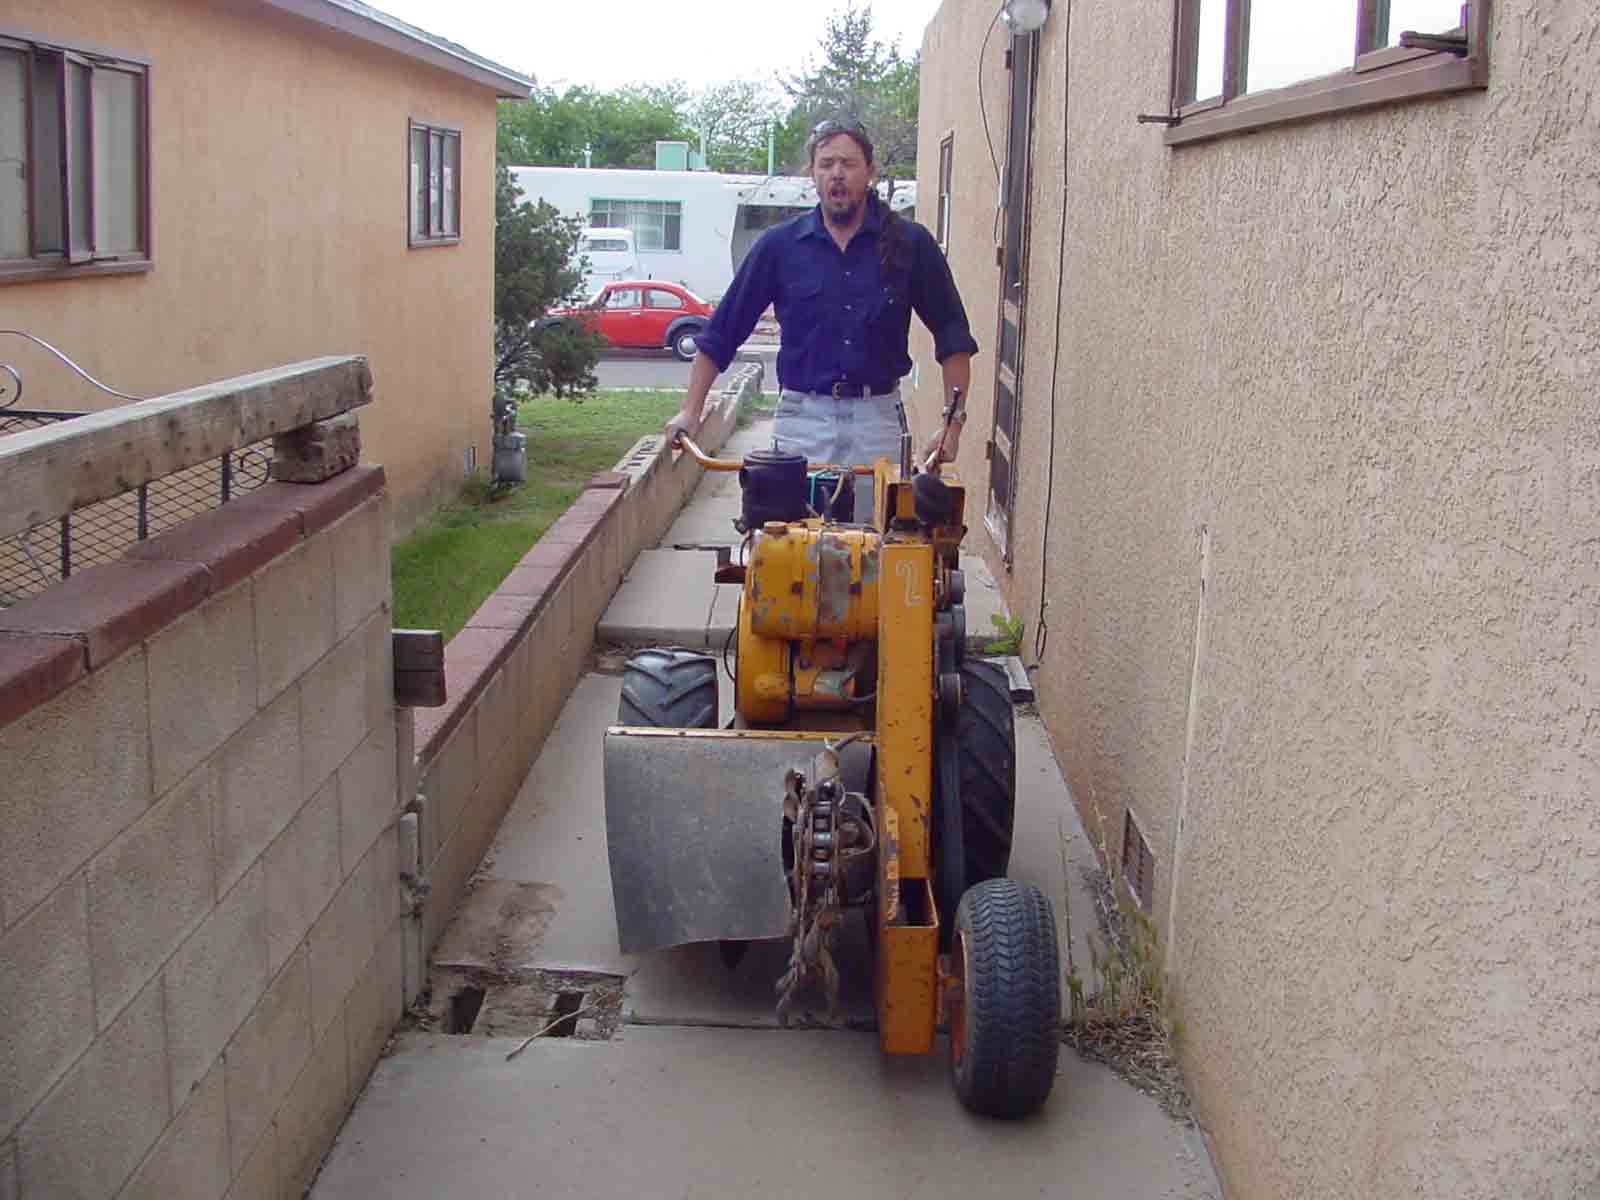
Next here's a picture of my buddy, Bat, bringing his trencher around to the back yard. You may notice a similarity between him and a couple bass players in a couple of my bands...<:^)
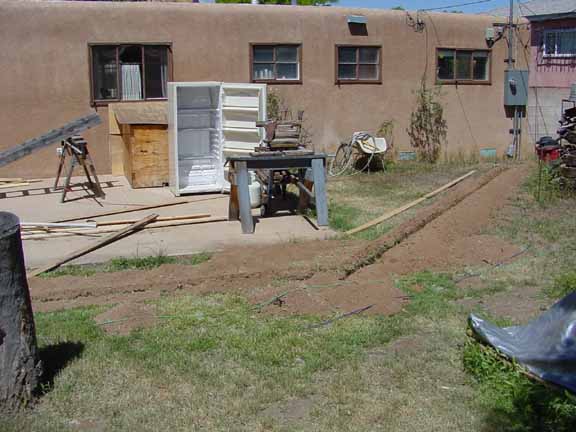
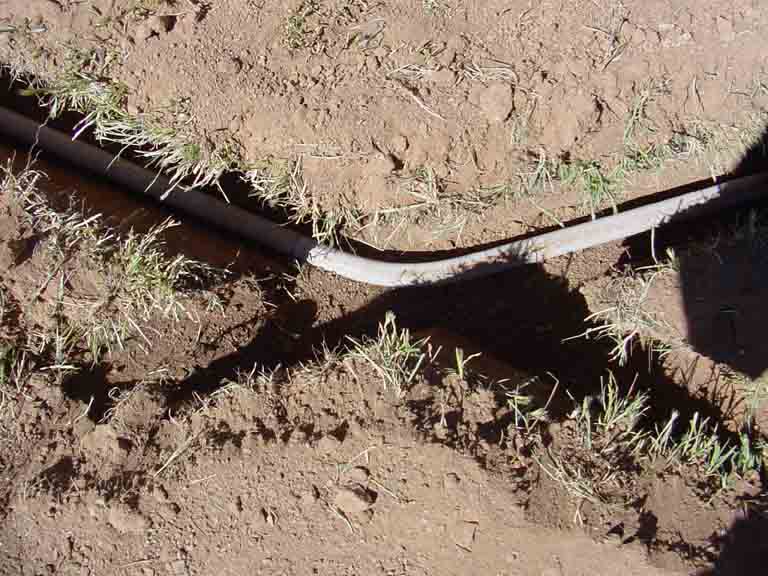
Next thing to do was run the conduit (my job was photographer).
You may notice the shop vac in the background of the first picture.
This was used to excavate fallen dirt from the trench. This has
been, by far, one of my better ideas.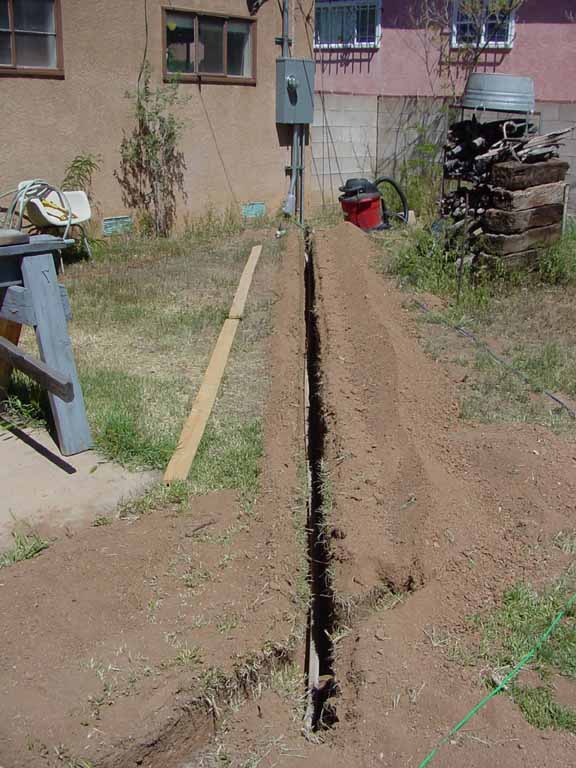


And then wiring it...
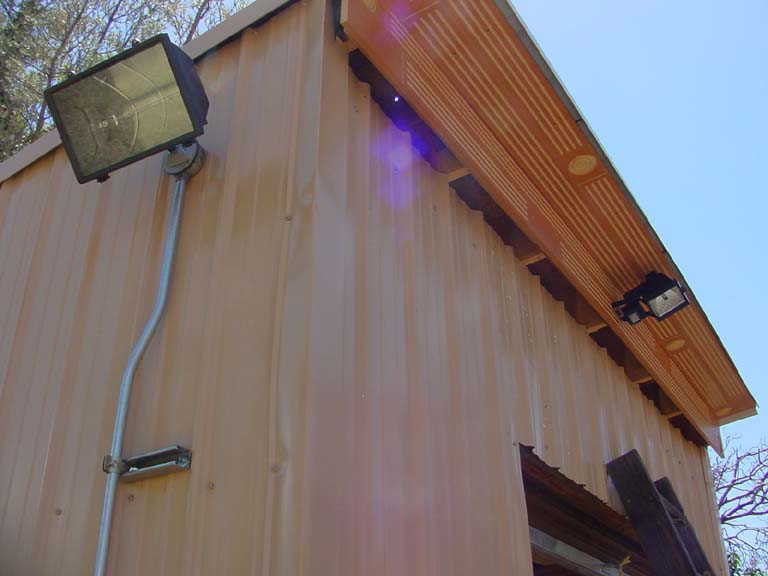
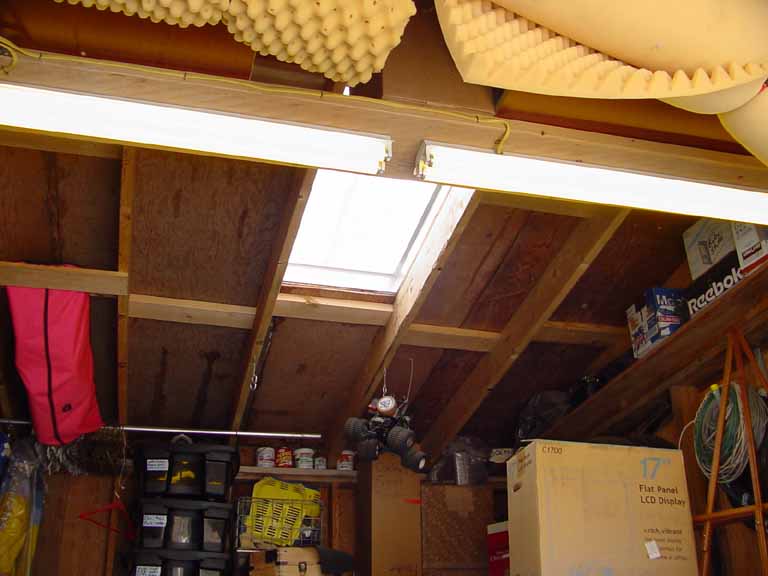
...and then installing lights, receptacles, and other junk...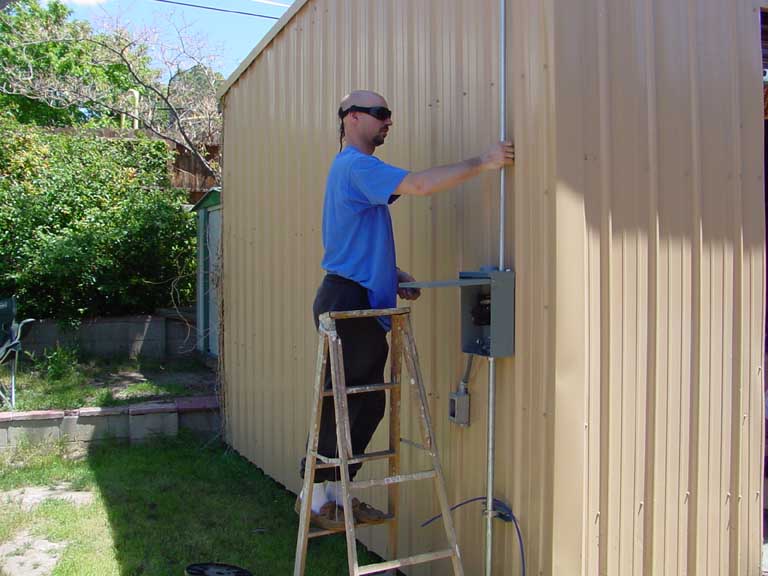
And finally indoor receptacles and lighting...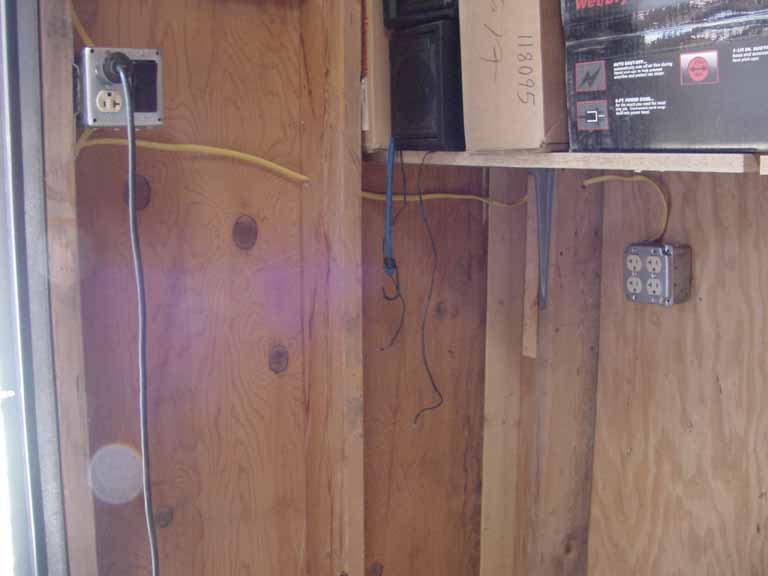
Go back to my projects page

All pictures & material Copyright © 2005 Donnie Frank